« 2014年01月 | メイン | 2014年03月 »
2014年02月 アーカイブ
2014年02月14日
2014年02月16日
[Event] Developers Summit 2014 参加レポート
概要
| 『Developers Summit 2014』 | |
|---|---|
| 会期 | 2014年2月13日(木)・14日(金) |
| 会場 | 目黒雅叙園 |
| 主催 | 翔泳社 |
目的
新人技術者教育とモバイル開発に関する情報収集。技術者との技術交流。
参加セッション
- 【13-C-1】 『Cocos2d-x によるスマートフォンアプリ開発のこれまでとこれから』 松浦 晃洋 〔シュハリ〕
- 【13-C-2】 『iOS/Android/Windowsストア・アプリのハイブリッド開発における限界と可能性』 佐々木 志門 〔日本アイ・ビー・エム〕
- 【13-C-L】 『iPad、Android、Windowsが文房具になる!デジタルインク技術のご紹介』 新村 剛史 〔ワコム〕


- 【13-C-3】 『Smashing Android UI, Androidデザインの極意』 佐藤 伸哉 〔AKQA〕
- 【13-A-4】 『新卒エンジニア研修ですべきことできること』 関口 亮一 〔ディー・エヌ・エー〕

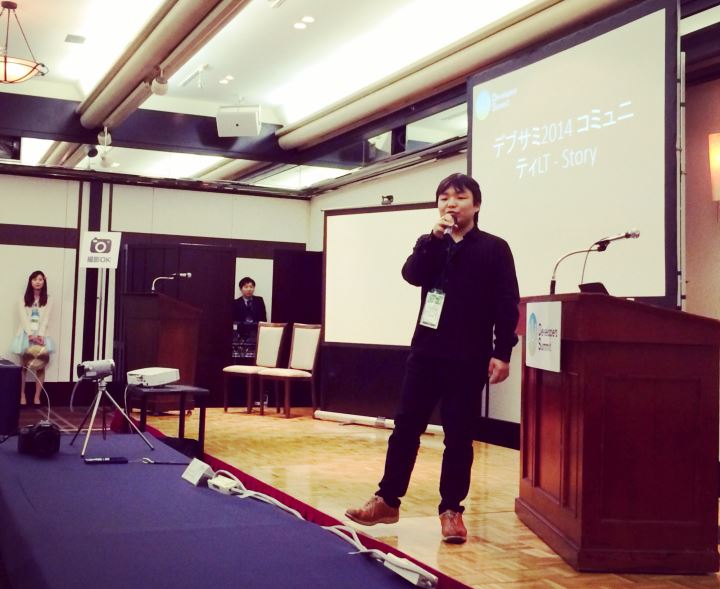
- 【13-D-7】 『デブサミ2014 コミュニティLT - Story』 まっちゃだいふく 〔ネットエージェント〕/太田 智美 他
- 【14-A-1】 『Webの現在過去未来』 竹迫 良範 〔サイボウズ・ラボ〕/宮川 達彦/和田 裕介 〔ワディット〕
- 【14-C-L】 『「開発手法は変えない」Windowsフォームとまったく同じ手法でWebアプリを開発』 森谷 勝 〔グレープシティ〕

- 【14-A-3】 『IMPACT MAPPING~インパクトのあるソフトウェアを作る』 平鍋 健児 〔チェンジビジョン〕

- 【14-D-4】 『 デベロッパー戦国時代!ストーリーをつなぐ開発環境と3つの秘訣』 長沢 智治 〔アトラシアン〕

- 【14-C-5】 『モーションセンサーの現状と2014年の予測』 中村 薫 〔Natural Software〕

- 【14-B-6】 『ソフトウェア工学からコンピューターサイエンスへ - 今後のシステムアーキテクチャーに必要な技術的切り口とその裏側』 萩原 正義 〔日本マイクロソフト〕

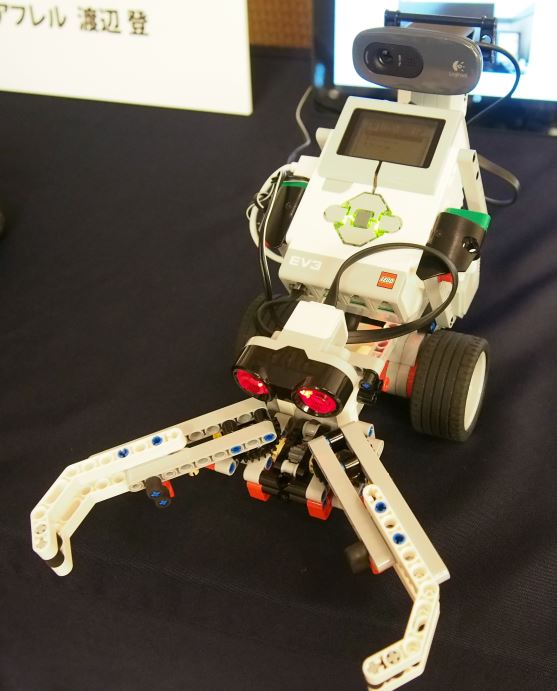
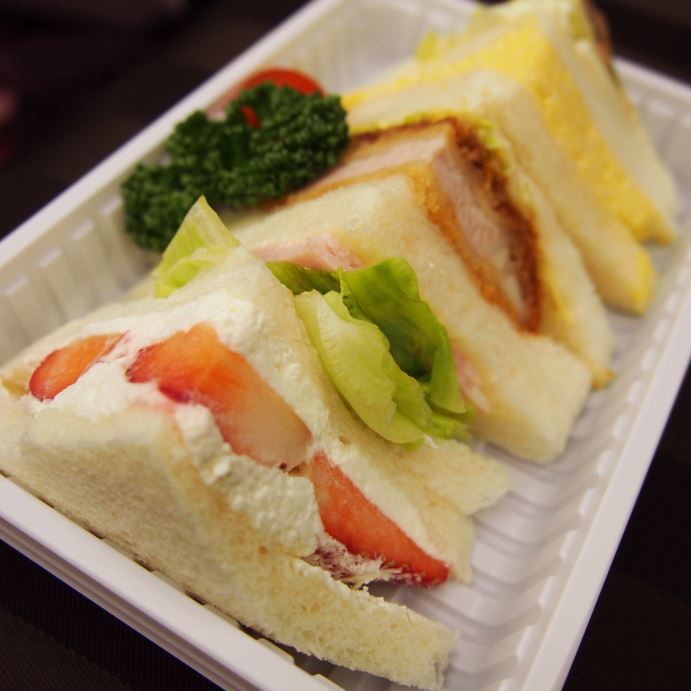
イベントの様子


所感
- 今回で10回目の参加となり、感慨深いものがある (下にこれまでの参加の記事をまとめてみた)。
- 私自身「新人技術者にどうプログラミングを教えたか」というごく短い発表を行ったが、『新卒エンジニア研修ですべきことできること』というセッションは特に興味深い内容だった。
- 「自走できるエンジニア」を育てる。
- 効果的だったのは、「計測」と「振り返り」と「フォローアップ」。
- 人にフォーカスした研修で人材の柔軟性を高めることで、組織にフィットする人材に。
- また、今回は iOS や Android 開発に関するセッションを多く受講した。特にマルチデバイス対応開発の情報が多く得られ、満足のいく結果となった。Xamarin や Unity の他、 について知ることができた。これから調べていきたい。
- IMPACT MAPPING のセッションでは、説得力のあるプレゼンテーションによって、マインドマップをソフトウェア開発の様々な場面で活用していく方法を分かりやすい学ぶことができた。
- 今回のDevelopers Summit では、NUI (Natural User Interface) に関するセッションや展示が多くみられ、今後のコンピューター技術の方向性を知ることができた。
- 2日目は、関東地方の雪のため、帰りの飛行機が欠航となり、急遽早く帰ることとなった。最後の方のセッションが聴けなかったのが心残りだ。
過去の Developers Summit の記事
- Developers Summit 2003
- Developers Summit 2004
- デブサミ2005
- デベロッパーズ サミット2005
- Developers Summit 2005 (デブサミ2005) ― VB.NET vs C# 『.NET 言語合戦』
- Developers Summit 2006
- Developers Summit 2006
- Developers Summit 2006 (デブサミ2006)
- Developers Summit 2007 コミュニティライブ
- Developers Summit 2008
- Developers Summit 2008 のときの写真
- Developers Summit 2009 に参加します
- Developers Summit 2011
- Developers Summit 2012 と codeseek & C# ユーザー会勉強会
- 「10年後も世界で通じるエンジニアであるために」 at Developers Summit 2012
- [Event] Developers Summit 2012 の LT「10年後も世界で通じるエンジニアであるために」の資料公開
- [Event] Developers Summit 2013
- 「新人技術者にどうプログラミングを教えたか」 at Developers Summit 2014
関連サイト
2014年02月17日
[TypeScript][WebGL] Hokuriku.NET Vol.13 in 富山「3D で遊ぼう ~C#er も TypeScript で楽々 WebGL~」の資料公開
2014年02月18日
[TypeScript] TypeScript の特長

■ TypeScript とは
C# のような静的型付き言語に慣れているプログラマーにとって、JavaScript は多少違和感がある。
「クラスがない」などは、ちょっと何言ってるか分からないかも知れない。
そこで TypeScript の登場だ。
特長
次のような特長がある。
- JavaScript のスーパーセット
- クラスベースオブジェクト指向のサポート
- 型を明記することによる静的型チェック
- JavaScript の次期標準仕様である ECMAScript6 を先駆けて取り込み
また、開発に便利な機能が多くある。
TypeScript にあって JavaScript にないものは例えば次のようなものだ (抜粋)。
- 静的型付け
- ラムダ式 ( => )
- アクセス制御 (public や private など)
- プロパティ (簡易に書ける C# のようなプロパティ)
- オーバーロード (これは C# などに比べるとイマイチ)
- デフォルト引数
- クラス
- 継承
- インタフェイス
- ジェネリクス
- 名前空間またはパッケージ
- 型推論 (C# 程ではない)
- Visual Studio での静的エラーの即時フィードバック
- Visual Studio でのインテリセンス
これらの機能を Visual Studio 上で使うことで、効率よく開発を行うことができる。
尚、Visual Studio では、TypeScript 上にブレークポイントを置いてデバッグ実行することが可能だ。
入手場所
TypeScript は次の場所でダウンロードでき、Visual Studio 2012 や 2013 にインストールすることができる。
TypeScript の JavaScript へのコンパイル
TypeScript コンパイラーは、TypeScript へのコードを JavaScript へとコンパイルする。
出来上がった JavaScript を HTML などに組み込んで使う訳だ。
実際にどのようにコンパイルされるか見てみよう。
TypeScript の新規プロジェクト
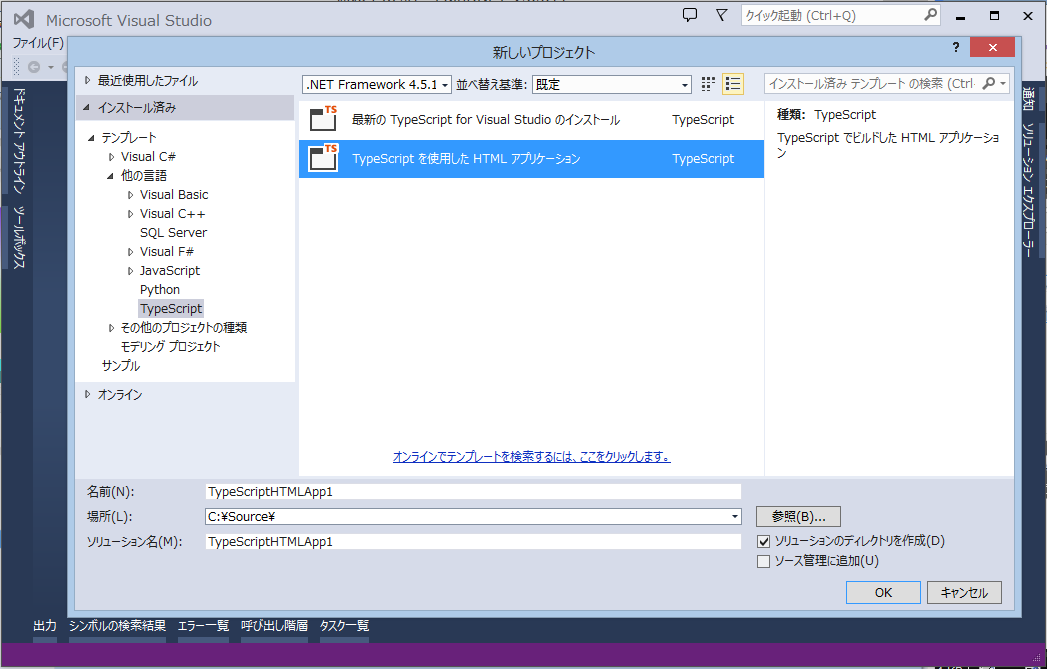
TypeScript をインストールした Visual Studio 2012 または 2013 で、メニュー「ファイル」 - 「新規作成」 - 「プロジェクト」から「他の言語」の中の「TypeScript」 - 「TypeScript を使用した HTML アプリケーション」を選択し、プロジェクトを新規に作成する。
このプロジェクトに TypeScript ファイルを新規に追加してコンパイルしてみよう。
注意点が一点。TypeScript ファイルの文字コードが「シフトJIS」になっていると、作られた JavaScript で日本語の文字が文字化けを起こすことがある。
例えば、次のような感じだ。
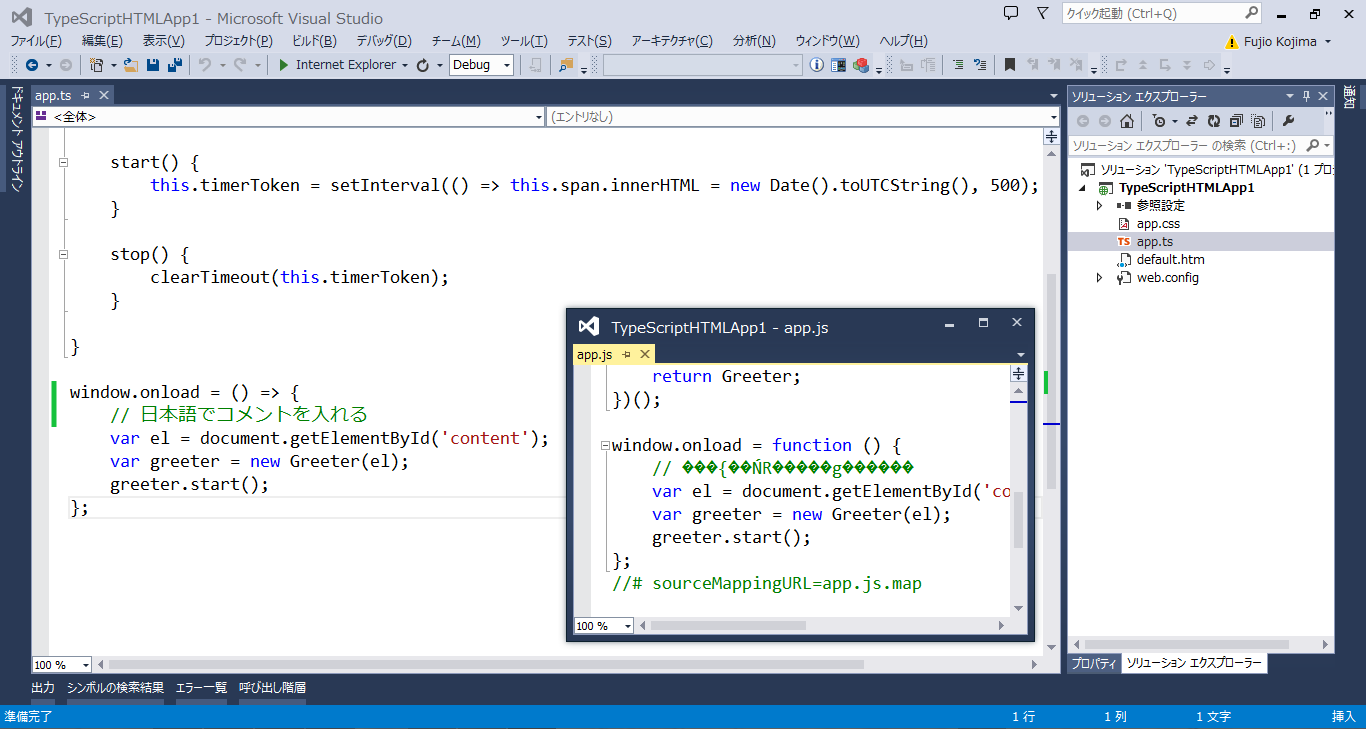
TypeScript ファイルの文字コードを Unicode に変更しておこう。
TypeScript ファイルを開いた状態で、メニュー「ファイル」 - 「保存オプションの詳細設定」で変更する。
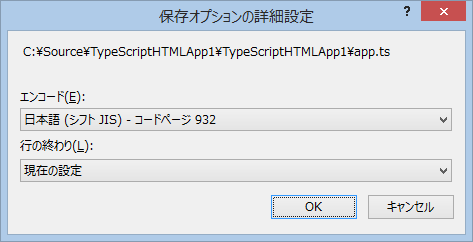
を

に変更する。
※ この問題は、TypeScript 0.9.5 で起こることを確認していたが、TypeScript 1.0RC で修正されていることを確認。(2014-02-28 追記)
試しに次のような TypeScript ファイル "vector.ts" を作成し、コンパイルしてみよう。
// モジュール (名前空間やパッケージのようなもの)
module Graphics {
    // 二次元ベクトルのクラス
    export class Vector {
        // コンストラクター
        constructor(public x: number = 0.0, public y: number = 0.0) {}

        // プロパティ (C# のプロパティにあたる/型付き)
        get length(): number {
            return Math.sqrt(this.x * this.x + this.y * this.y);
        }

        // メソッド (引数、戻り値ともに型付きにできる)
        add(vector: Vector): Vector {
            return new Vector(this.x + vector.x, this.y + vector.y);
        }

        multiply(vector: Vector): Vector {
            return new Vector(this.x * vector.x, this.y * vector.y);
        }
    }
}
Pascal のように型名が前でなく後ろにくるなどの違いはあるが、C# などに慣れている人にはそれ程違和感のないコードだ。
これは、C# の次のようなコードにあたる。
using System;

// 名前空間
namespace Graphics
{
    // 二次元ベクトルのクラス
    public class Vector {
        public double X { get; set; }
        public double Y { get; set; }

        // コンストラクター
        public Vector(double x = 0.0, double y = 0.0)
        {
            X = x;
            Y = y;
        }

        // プロパティ
        public double Length
        {
            get { return Math.Sqrt(X * X + Y * Y); }
        }

        // メソッド
        public Vector Add(Vector vector)
        {
            return new Vector(X + vector.X, Y + vector.Y);
        }

        public Vector Multiply(Vector vector)
        {
            return new Vector(X * vector.X, this.Y * vector.Y);
        }
    }
}
この TypeScript を、コンパイルすると "vector.js" という JavaScript ファイルが作られる。
// モジュール (名前空間やパッケージのようなもの)
var Graphics;
(function (Graphics) {
    // 二次元ベクトルのクラス
    var Vector = (function () {
        // コンストラクター
        function Vector(x, y) {
            if (typeof x === "undefined") { x = 0.0; }
            if (typeof y === "undefined") { y = 0.0; }
            this.x = x;
            this.y = y;
        }
        Object.defineProperty(Vector.prototype, "length", {
            // プロパティ (C# のプロパティにあたる/型付き)
            get: function () {
                return Math.sqrt(this.x * this.x + this.y * this.y);
            },
            enumerable: true,
            configurable: true
        });

        // メソッド (引数、戻り値ともに型付きにできる)
        Vector.prototype.add = function (vector) {
            return new Vector(this.x + vector.x, this.y + vector.y);
        };

        Vector.prototype.multiply = function (vector) {
            return new Vector(this.x * vector.x, this.y * vector.y);
        };
        return Vector;
    })();
    Graphics.Vector = Vector;
})(Graphics || (Graphics = {}));
//# sourceMappingURL=vector.js.map
ちゃんと JavaScript に変換されているのが分かる。
これを HTML に組み込んで使えば OK だ。
2014年02月19日
[TypeScript] ImageData によるピクセル単位の描画
今回は TypeScript による JavaScript で、HTML5 の Canvas 上の ImageData にピクセル単位の描画を行う例をあげてみる。
描画自体は、特に TypeScript に依存した内容ではないが、TypeScript に慣れるためのサンプルという意味合いだ。
HTML5 の Canvas に ImageData を作成してピクセル単位の描画を行う
前回を参考に、Visual Studio で「TypeScript を使用した HTML アプリケーション」を作成してやってみよう。
先ず setpixelsample.html という HTML ファイルを用意する。
<!DOCTYPE html>
<html lang="en">
<head>
    <meta charset="utf-8" />
    <title>SetPixel Sample</title>
    <script src="setpixelsample.js"></script>
</head>
<body onload="SetPixelSample.Program.run()">
    <canvas width="500" height="500"></canvas>
</body>
</html>
この HTML ファイルでは、setpixelsample.js という JavaScript ファイルを組み込んでいる。そこで setpixelsample.ts という TypeScript ファイルを追加する。
また、onload="SetPixelSample.Program.run()" という記述があるが、このメソッドも setpixelsample.ts 内に用意する。
そして、このメソッド内から HTML 内の canvas に描画を行うこととする。
canvas オブジェクトを取得し、その中に (canvas オブジェクトと同じ幅と高さの) ImageData オブジェクトを作成するには、createImageData を使う。
	var canvas    = <HTMLCanvasElement>document.querySelector("canvas");
	var context   = canvas.getContext("2d");
	var imageData = context.createImageData(canvas.width, canvas.height);
また、ImageData オブジェクトに任意の色のピクセルを置くには、次のように ImageData オブジェクトの data に赤、緑、青、アルファ値の順で1バイトずつ書き込めば良い。
    // ImageData の指定した座標の 1 ピクセルを指定した色にする
    private static setPixel(imageData: ImageData, x: number, y: number, red: number, green: number, blue: number, alpha: number = 0xff) {
        // 指定した座標のピクセルが ImageData の data のどの位置にあるかを計算
        var index = (x + y * imageData.width) * 4;

        // その位置から、赤、緑、青、アルファ値の順で1バイトずつ書き込むことで、ピクセルがその色になる
        imageData.data[index + 0] = red  ;
        imageData.data[index + 1] = green;
        imageData.data[index + 2] = blue ;
        imageData.data[index + 3] = alpha;
    }
任意の色のピクセルが置かれた ImageData オブジェクトを描画するには putImageData を使う。
    // ImageData を描画
    context.putImageData(imageData, 0, 0);
ImageData オブジェクトにランダムに 100,000 個のピクセルを置いて描画するサンプルを作ってみると次のようになる (setpixelsample.ts)。
module SetPixelSample {
    export class Program {
        static run() {
            var canvas    = <HTMLCanvasElement>document.querySelector("canvas");
            var context   = canvas.getContext("2d");
            var imageData = context.createImageData(canvas.width, canvas.height);

            // ImageData にランダムにピクセルを置く
            Program.setRandomPixels(canvas, imageData);

            // ImageData を描画
            context.putImageData(imageData, 0, 0);
        }

        // ImageData のランダムな座標のピクセルをランダムな色にする
        private static setRandomPixels(canvas: HTMLCanvasElement, imageData: ImageData) {
            for (var index = 0; index < 100000; index++) {
                var x     = Program.randomInteger(canvas.height);
                var y     = Program.randomInteger(canvas.width );
                var red   = Program.randomInteger(0x100        );
                var green = Program.randomInteger(0x100        );
                var blue  = Program.randomInteger(0x100        );
                Program.setPixel(imageData, x, y, red, green, blue);
            }
        }

        // 疑似乱数 (0 から value 未満の整数)
        private static randomInteger(value: number): number {
            return Math.floor(value * Math.random());
        }

        // ImageData の指定した座標の 1 ピクセルを指定した色にする
        private static setPixel(imageData: ImageData, x: number, y: number, red: number, green: number, blue: number, alpha: number = 0xff) {
            // 指定した座標のピクセルが ImageData の data のどの位置にあるかを計算
            var index = (x + y * imageData.width) * 4;

            // その位置から、赤、緑、青、アルファ値の順で1バイトずつ書き込むことで、ピクセルがその色になる
            imageData.data[index + 0] = red  ;
            imageData.data[index + 1] = green;
            imageData.data[index + 2] = blue ;
            imageData.data[index + 3] = alpha;
        }
    }
}
コンパイルして setpixelsample.js を生成し、setpixelsample.html を Internet Explorer 9 以降等の HTML5 対応の Web ブラウザーで表示してみると次のようにランダムな 100,000 個のピクセルが描画される。
実際のサンプルを次の場所に用意した。
2014年02月20日
[TypeScript][C#][Windows ストア アプリ] ImageData によるマンデルブロ集合の描画
※ 『[TypeScript] ImageData によるピクセル単位の描画』の続き。
前回は、HTML5 の Canvas に ImageData を作成してランダムなピクセルを描画した。
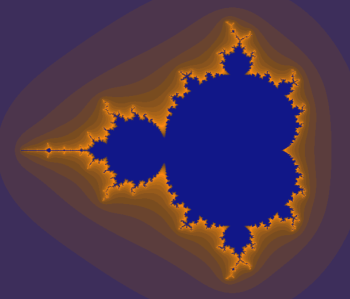
今回も同様にピクセル単位の描画を行ってみよう。少しだけ応用してマンデルブロ集合を描画してみる。
マンデルブロ集合
マンデルブロ集合は、フラクタルとして有名な図形だ。
詳しくは、次の場所が参考になる:
HTML5 の Canvas にマンデルブロ集合を描画する
HTML5 の Canvas にピクセル単位の描画を行う方法については、前回を参考にしてほしい。
今回は、TypeScript の特長である「クラス設計のやり易さ」を活かすこととし、前回よりもきちんとクラス分けを行ってみたい。
先ず、前回同様の mandelbrot.html という HTML ファイルを用意する。
<!DOCTYPE html>
<html lang="en">
<head>
    <meta charset="utf-8" />
    <title>Mandelbrot Sample</title>
    <script src="graph.js"></script>
    <script src="mandelbrot.js"></script>
</head>
<body onload="MandelbrotSample.MainProgram.run()">
    <canvas width="800" height="800"></canvas>
</body>
</html>
<!--
Usage:
    mandelbrot.html		                  : position = (-2.8, 2.0), scale = 4.0
    mandelbrot.html?posy=1&scale=2        : position = (-2.8, 1.0), scale = 2.0
    mandelbrot.html?posx=0&posy=0&scale=1 : position = ( 0.0, 0.0), scale = 1.0

    - This HTML can work with mandelbrot.js and graph.js online or offline.
-->
この HTML ファイルでは、graph.js と mandelbrot.js という2つの JavaScript ファイルを組み込んでいる。 それぞれ graph.ts と mandelbrot.ts いう TypeScript ファイルから生成されることになる。
onload="MandelbrotSample.MainProgram.run()" という記述があるが、このメソッドは mandelbrot.ts 内に用意する。
graph.ts
graph.ts は、Canvas にピクセル単位の描画を行うモジュールだ。
今回は、Canvas もクラス化してみよう。ピクセル毎に描画を行う部分もクラス化する。
また、座標、大きさ、矩形、色などの基本的なクラスもここに置くことにする。
module Graph {
    // 色
    export class Color {
        constructor(public red: number = 0x00, public green: number = 0x00, public blue: number = 0x00, public alpha: number = 0xff) { }
    }

    // 二次元ベクトル
    export class Vector {
        constructor(public x: number = 0.0, public y: number = 0.0) {}

        add(vector: Vector): Vector {
            return new Vector(this.x + vector.x, this.y + vector.y);
        }

        multiply(vector: Vector): Vector {
            return new Vector(this.x * vector.x, this.y * vector.y);
        }

        multiplyBy(value: number): Vector {
            return new Vector(this.x * value, this.y * value);
        }
    }

    // 二次元の大きさ
    export class Size {
        constructor(public width: number, public height: number) {}
    }

    // 矩形
    export class Rectangle {
        constructor(public position: Vector, public size: Size) {}
    }

    // ImageData への描画用
    class ImageDataHelper {
        // ImageData の指定した座標の 1 ピクセルを指定した色にする
        static setPixel(imageData: ImageData, position: Vector, color: Color) {
            // ImageData のサイズ
            var imageDataSize         = new Size(imageData.width, imageData.height);
            // 指定したピクセルの座標が有効でなかったら
            if (!ImageDataHelper.isValid(imageDataSize, position))
                return;

            // 指定した座標のピクセルが ImageData の data のどの位置にあるかを計算
            var index                 = ImageDataHelper.toIndex(imageDataSize, position);
            // その位置から、赤、緑、青、アルファ値の順で1バイトずつ書き込むことで、ピクセルがその色になる
            imageData.data[index + 0] = color.red  ;
            imageData.data[index + 1] = color.green;
            imageData.data[index + 2] = color.blue ;
            imageData.data[index + 3] = color.alpha;
        }

        // 指定したピクセルの座標が有効かどうか
        private static isValid(imageDataSize: Size, position: Vector): boolean {
            return position.x >= 0.0 && position.x <= imageDataSize.width  &&
                   position.y >= 0.0 && position.y <= imageDataSize.height;
        }

        // 指定した座標のピクセルが ImageData の data のどの位置にあるかを計算
        private static toIndex(imageDataSize: Size, position: Vector): number {
            return (position.x + position.y * imageDataSize.width) * 4;
        }
    }

    // Canvas に ImageData を置きピクセル毎に描画を行う
    export class Sheet {
        private context_  : CanvasRenderingContext2D;
        private imageData_: ImageData;

        get context() {
            return this.context_;
        }

        constructor(context: CanvasRenderingContext2D, size: Size) {
            this.context_   = context;
            this.imageData_ = context.createImageData(size.width, size.height);
        }

        // ImageData の指定した座標の 1 ピクセルを指定した色にする
        setPixel(position: Vector, color: Color) {
            ImageDataHelper.setPixel(this.imageData_, position, color);
        }

        // 指定した位置に ImageData を描画
        draw(position: Vector = new Vector()) {
            this.context.putImageData(this.imageData_, position.x, position.y);
        }
    }

    // キャンバス
    export class Canvas {
        private canvas_ : HTMLCanvasElement;
        private context_: CanvasRenderingContext2D;

        constructor() {
            this.canvas_  = <HTMLCanvasElement>document.querySelector("canvas");
            this.context_ = this.canvas_.getContext("2d");
        }

        get size(): Graph.Size {
            return Canvas.getCanvasSize(this.canvas_);
        }

        get position(): Graph.Rectangle {
            return new Graph.Rectangle(new Graph.Vector(), this.size);
        }

        get context(): CanvasRenderingContext2D {
            return this.context_;
        }

        private static getCanvasSize(canvas: HTMLCanvasElement): Graph.Size {
            return new Graph.Size(canvas.width, canvas.height);
        }
    }
}
mandelbrot.ts
mandelbrot.ts は、Canvas にマンデルブロ集合を描画する行うモジュールだ。
メイン プログラム、マンデルブロ集合、マンデルブロ集合を描画するときのパラメーター、そしてパラメーターをクエリ文字列から取得するためのユーティリティの各クラスからなる。
/// <reference path="graph.ts"/>

module MandelbrotSample {
    class Utility {
        // クエリ文字列から数を取得
        static getNumberFromQueryString(key: string): number {
            var queryString = Utility.getQueryString(key);
            if (queryString != "") {
                try {
                    return parseInt(queryString);
                } catch (ex) {}
            }
            return null;
        }

        // クエリ文字列の取得
        static getQueryString(key: string, default_: string = null): string {
            if (default_ == null)
                default_ = "";
            key             = key.replace(/[\[]/, "\\\[").replace(/[\]]/, "\\\]");
            var regex       = new RegExp("[\\?&]" + key + "=([^&#]*)");
            var queryString = regex.exec(window.location.href);
            return queryString == null ? default_ : queryString[1];
        }
    }

    // パラメーター
    class Parameter {
        position      : Graph.Vector = new Graph.Vector(-2.8, 2.0);
        maximum       : number       = 32;
        private scale_: number       = 4.0;

        get ratio(): number {
            return this.scale_ / this.size.width;
        }

        constructor(public size: Graph.Size) {
            this.setPositionX();
            this.setPositionY();
            this.setScale    ();
            this.setMaximum  ();
        }

        private setPositionX() {
            var positionX = Utility.getNumberFromQueryString("posx");
            if (positionX != null)
                this.position.x = positionX;
        }

        private setPositionY() {
            var positionY = Utility.getNumberFromQueryString("posy");
            if (positionY != null)
                this.position.y = positionY;
        }

        private setScale() {
            var scale = Utility.getNumberFromQueryString("scale");
            if (scale != null)
                this.scale_ = scale;
        }

        private setMaximum() {
            var maximum = Utility.getNumberFromQueryString("max");
            if (maximum != null)
                this.maximum = maximum;
        }
    }

    class Mandelbrot {
        private position_ : Graph.Vector;
        private sheet_    : Graph.Sheet;
        private parameter_: Parameter;

        constructor(context: CanvasRenderingContext2D, position: Graph.Rectangle, size: Graph.Size) {
            this.position_  = position.position;
            this.sheet_     = new Graph.Sheet(context, size);
            this.parameter_ = new Parameter(size);
        }

        draw(palette: Graph.Color[]) {
            var point = new Graph.Vector();
            for (point.y = 0; point.y < this.parameter_.size.height; point.y++) {
                for (point.x = 0; point.x < this.parameter_.size.width; point.x++) {
                    var a = this.parameter_.position.add(new Graph.Vector(point.x, -point.y).multiplyBy(this.parameter_.ratio));
                    this.setPixel(point, this.getCount(a), palette);
                }
            }
            this.sheet_.draw(this.position_);
        }

        private getCount(a: Graph.Vector): number {
            var squareBorder = 25.0;
            var square       = new Graph.Vector();
            var point        = new Graph.Vector();
            var count        = 0;
            do {
                point  = new Graph.Vector(square.x - square.y + a.x, 2.0 * point.x * point.y + a.y);
                square = point.multiply(point);
                count++;
            } while (square.x + square.y < squareBorder && count <= this.parameter_.maximum);
            return count < this.parameter_.maximum ? count : 0;
        }

        private setPixel(point: Graph.Vector, count: number, palette: Graph.Color[]) {
            this.sheet_.setPixel(point, palette[Mandelbrot.toColorIndex(count, palette.length)]);
        }

        private static toColorIndex(colorNumber: number, paletteSize: number): number {
            var colorIndexNumber = paletteSize * 2 - 2;
            var colorIndex       = colorNumber % colorIndexNumber;
            if (colorIndex >= paletteSize)
                colorIndex = colorIndexNumber - colorIndex;
            return colorIndex;
        }
    }

    export class MainProgram {
        static run() {
            var canvas     = new Graph.Canvas();
            var mandelbrot = new Mandelbrot(canvas.context, canvas.position, canvas.size);
            mandelbrot.draw(MainProgram.getPalette());
        }

        // パレット (予め色を格納しておき、パレット番号で色を参照)
        private static getPalette(): Graph.Color[] {
            return [
                new Graph.Color(0x02, 0x08, 0x80),
                new Graph.Color(0x10, 0x10, 0x70),
                new Graph.Color(0x20, 0x18, 0x60),
                new Graph.Color(0x30, 0x20, 0x50),
                new Graph.Color(0x40, 0x28, 0x40),
                new Graph.Color(0x50, 0x30, 0x30),
                new Graph.Color(0x60, 0x38, 0x20),
                new Graph.Color(0x70, 0x40, 0x10),
                new Graph.Color(0x80, 0x48, 0x0e),
                new Graph.Color(0x90, 0x50, 0x0c),
                new Graph.Color(0xa0, 0x58, 0x0a),
                new Graph.Color(0xb0, 0x60, 0x08),
                new Graph.Color(0xc0, 0x68, 0x06),
                new Graph.Color(0xd0, 0x70, 0x04),
                new Graph.Color(0xe8, 0x78, 0x02),
                new Graph.Color(0xff, 0x80, 0x01)
            ];
        }
    }
}
クラス図
以上のクラス構成を、クラス図で見てみよう。次のようになる。
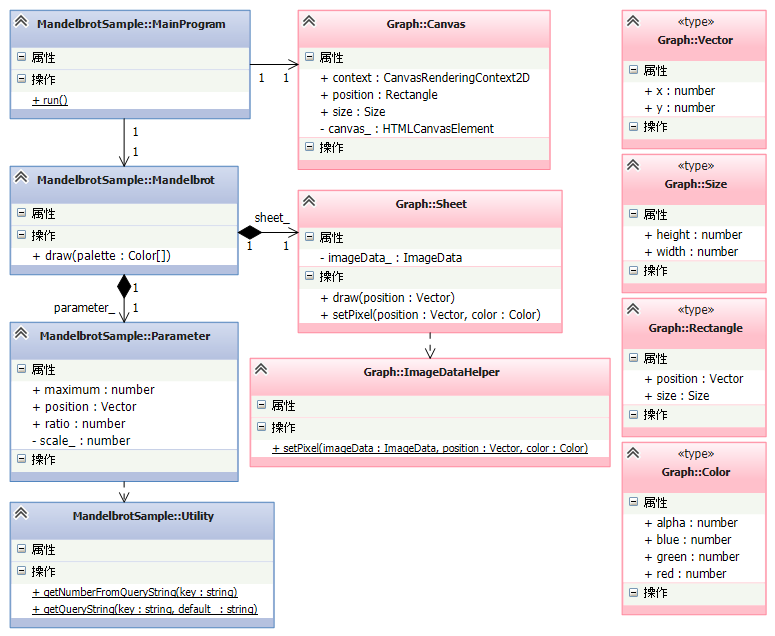
TypeScript を使っている為に、このようなクラス設計は比較的容易だ。
実行例
では、実行してみよう。
コンパイルすると、graph.js と mandelbrot.js が生成される。
mandelbrot.html を Internet Explorer 9 以降等の HTML5 対応の Web ブラウザーで表示してみると、次のようにマンデルブロ集合が描画される。
実際のサンプルを次の場所に用意した。
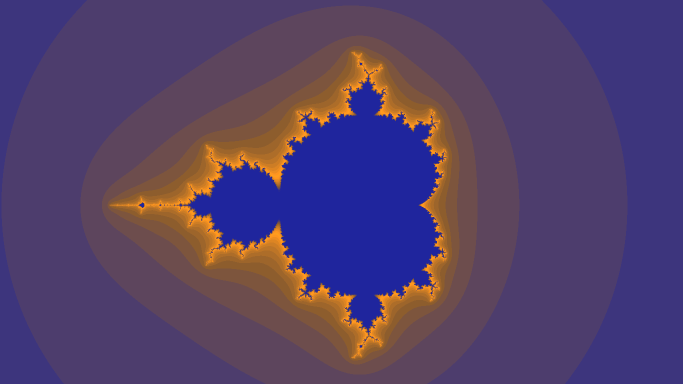
マンデルブロ集合のどこを描画するかを指定するパラメーターがクエリ文字列で渡せるようになっているので、次のようにして描画位置を変えることができる。
C# で作成した例
比較の為に、同様のものを C# (Windows ストア アプリ) で作成してみよう。
Visual Studio でメニュー「新規作成」 - 「プロジェクト」から「Visual C#」 - 「Windows ストア」 - 「新しいアプリケーション (XAML)」で Windows ストア アプリを新規作成する。
App.xaml と App.xaml.cs には特に変更を加えない。
MainPage.xaml と MainPage.xaml.cs
謂わば mandelbrot.html にあたる部分。 TypeScript の場合同様、こちらも Canvas にイメージのオブジェクトを置き、描画する。
<Page
    x:Class="MandelbrotSample.WindowsStore.MainPage"
    xmlns="http://schemas.microsoft.com/winfx/2006/xaml/presentation"
    xmlns:x="http://schemas.microsoft.com/winfx/2006/xaml"
    xmlns:local="using:MandelbrotSample.WindowsStore"
    xmlns:d="http://schemas.microsoft.com/expression/blend/2008"
    xmlns:mc="http://schemas.openxmlformats.org/markup-compatibility/2006"
    mc:Ignorable="d" Loaded="Page_Loaded">
    <Grid Background="{ThemeResource ApplicationPageBackgroundThemeBrush}">
        <Canvas x:Name="canvas">
            <Image x:Name="image" />
        </Canvas>
        <ProgressRing x:Name="progress" Width="50" Height="50" Foreground="Blue" />
    </Grid>
</Page>
using MandelbrotSample.WindowsStore.Graph;
using System.Threading.Tasks;
using Windows.UI.Xaml;
using Windows.UI.Xaml.Controls;

namespace MandelbrotSample.WindowsStore
{
    public sealed partial class MainPage : Page
    {
        public MainPage()
        {
            InitializeComponent();
        }

        async void Page_Loaded(object sender, RoutedEventArgs e)
        {
            await Run();
        }

        async Task Run()
        {
            var canvasPosition = new IntRectangle { Position = new IntVector(),
                                                    Size     = new IntSize { Width  = (int)canvas.ActualWidth ,
                                                                             Height = (int)canvas.ActualHeight } };

            progress.IsActive  = true ;
            await MainProgram.RunAsync(canvasPosition, image);
            progress.IsActive  = false;
        }
    }
}
Graph.cs
graph.ts にあたる部分は次のような感じ。
こちらでは、Palette はクラスにした。
また、TypeScript では number という型だったものは、int と double に分けた。
using System.Diagnostics;
using System.IO;
using System.Runtime.InteropServices.WindowsRuntime;
using Windows.UI;
using Windows.UI.Xaml.Media.Imaging;

namespace MandelbrotSample.WindowsStore.Graph
{
    public class Palette
    {
        readonly Color[] colors;

        public int Size
        {
            get { return colors.Length; }
        }

        public Palette(int size)
        { colors = new Color[size]; }

        public Color this[int index]
        {
            get
            {
                return index >= 0 && index < Size ? colors[index] : new Color();
            }
            set
            {
                if (index >= 0 && index < Size)
                    colors[index] = value;
            }
        }
    }

    public class Vector
    {
        public double X { get; set; }
        public double Y { get; set; }

        public static Vector operator +(Vector vector1, Vector vector2)
        {
            return new Vector { X = vector1.X + vector2.X, Y = vector1.Y + vector2.Y };
        }

        public static Vector operator -(Vector vector1, Vector vector2)
        {
            return new Vector { X = vector1.X - vector2.X, Y = vector1.Y - vector2.Y };
        }

        public static Vector operator *(Vector vector1, Vector vector2)
        {
            return new Vector { X = vector1.X * vector2.X, Y = vector1.Y * vector2.Y };
        }

        public static Vector operator *(Vector vector, double value)
        {
            return new Vector { X = vector.X * value, Y = vector.Y * value };
        }

        public static Vector operator /(Vector vector, double value)
        {
            return new Vector { X = vector.X / value, Y = vector.Y / value };
        }
    }

    public class IntVector
    {
        public int X { get; set; }
        public int Y { get; set; }

        public static IntVector operator -(IntVector vector, IntSize size)
        {
            return new IntVector { X = vector.X - size.Width, Y = vector.Y - size.Height };
        }
    }

    public class IntSize
    {
        public int Width  { get; set; }
        public int Height { get; set; }

        public static IntSize operator +(IntSize size1, IntSize size2)
        {
            return new IntSize { Width = size1.Width + size2.Width, Height = size1.Height + size2.Height };
        }

        public static IntSize operator *(IntSize size, IntVector vector)
        {
            return new IntSize { Width = size.Width * vector.X, Height = size.Height * vector.Y };
        }
    }

    public class IntRectangle
    {
        public IntVector Position { get; set; }
        public IntSize   Size     { get; set; }
    }

    public static class WriteableBitmapExtension
    {
        public static void Clear(this WriteableBitmap bitmap, Color color)
        {
            var arraySize = bitmap.PixelBuffer.Capacity;
            var array     = new byte[arraySize];
            for (var index = 0; index < arraySize; index += 4) {
                array[index    ] = color.B;
                array[index + 1] = color.G;
                array[index + 2] = color.R;
                array[index + 3] = color.A;
            }
            using (var pixelStream = bitmap.PixelBuffer.AsStream()) {
                pixelStream.Seek(0, SeekOrigin.Begin);
                pixelStream.Write(array, 0, array.Length);
            }
        }

        public static void SetPixel(this WriteableBitmap bitmap, int x, int y, Color color)
        {
            var bitmapWidth  = bitmap.PixelWidth;
            var bitmapHeight = bitmap.PixelHeight;
            if (!IsValid(bitmapWidth, bitmapHeight, x, y))
                return;
            var index = ToIndex(bitmapWidth, x, y);
            Debug.Assert(index >= 0 && index < bitmap.PixelBuffer.Capacity);

            using (var pixelStream = bitmap.PixelBuffer.AsStream()) {
                var array = new byte[] { color.B, color.G, color.R, color.A };
                pixelStream.Seek(index, SeekOrigin.Begin);
                pixelStream.Write(array, 0, array.Length);
            }
        }

        static int ToIndex(int bitmapWidth, int x, int y)
        {
            return (x + y * bitmapWidth) * 4;
        }

        static bool IsValid(int width, int height, int x, int y)
        {
            return x >= 0 && x < width  &&
                   y >= 0 && y < height;
        }
    }

    public class Sheet
    {
        public WriteableBitmap Bitmap { get; set; }

        public Sheet(IntSize size, Color backgroundColor = new Color())
        {
            Bitmap = new WriteableBitmap(size.Width, size.Height);
            Bitmap.Clear(backgroundColor);
        }

        public void SetPixel(IntVector position, Color color)
        { Bitmap.SetPixel(position.X, position.Y, color); }
    }
}
Mandelbrot.cs
mandelbrot.ts にあたる部分は次のような感じ。
TypeScript の run メソッドは、非同期の RunAsync とした。
using MandelbrotSample.WindowsStore.Graph;
using System;
using System.Threading.Tasks;
using Windows.UI;
using Windows.UI.Xaml;
using Windows.UI.Xaml.Controls;
using Windows.UI.Xaml.Media.Imaging;

namespace MandelbrotSample.WindowsStore
{
    public class Mandelbrot
    {
        public class Parameter {
            public Vector    Position { get; private set; }
            public int       Maximum  { get; private set; }
            public IntSize   Size     { get; private set; }
            public double    Ratio    { get; private set; }

            public Parameter(IntSize size) : this(position: new Vector { X = -2.8, Y = 1.5 }, scale: 5.0, maximum: 32, size: size)
            {}

            public Parameter(Vector position, double scale, int maximum, IntSize size)
            {
                Position = position;
                Maximum  = maximum;
                Size     = size;
                Ratio    = scale / size.Width;
            }
        }

        const double       squareBorder = 25.0;

        readonly Sheet     sheet;
        readonly Parameter parameter;

        public WriteableBitmap Bitmap
        {
            get { return sheet.Bitmap; }
        }

        public Mandelbrot(IntRectangle position, Color backgroundColor = new Color())
        {
            sheet          = new Sheet(position.Size, backgroundColor);
            this.parameter = new Parameter(size: position.Size);
        }

        public Mandelbrot(IntRectangle position, Parameter parameter, Color backgroundColor = new Color())
        {
            sheet          = new Sheet(position.Size, backgroundColor);
            this.parameter = parameter;
        }

        public void Draw(Palette palette)
        {
            var point = new Graph.IntVector();
            for (point.Y = 0; point.Y < parameter.Size.Height; point.Y++) {
                for (point.X = 0; point.X < this.parameter.Size.Width; point.X++) {
                    var a = parameter.Position + new Vector { X = point.X, Y = -point.Y } * parameter.Ratio;
                    SetPixel(point, GetCount(a), palette);
                }
            }
        }

        int GetCount(Vector a)
        {
            var square = new Vector();
            var point  = new Vector();
            var count  = 0;
            do {
                point  = new Vector { X = square.X - square.Y + a.X, Y = 2.0 * point.X * point.Y + a.Y };
                square = point * point;
                count++;
            } while (square.X + square.Y < squareBorder && count <= parameter.Maximum);
            return count < parameter.Maximum ? count : 0;
        }

        void SetPixel(IntVector point, int count, Palette palette)
        {
            sheet.SetPixel(point, palette[ToColorIndex(count, palette.Size)]);
        }

        static int ToColorIndex(int colorNumber,  int paletteSize)
        {
            var colorIndexNumber = paletteSize * 2 - 2;
            var colorIndex       = colorNumber % colorIndexNumber;
            if (colorIndex >= paletteSize)
                colorIndex = colorIndexNumber - colorIndex;
            return colorIndex;
        }
    }

    class MainProgram
    {
        public static async Task RunAsync(IntRectangle canvasPosition, Image image)
        {
            await Window.Current.Dispatcher.RunIdleAsync(e => image.Source = DrawMandelbrot(canvasPosition));
        }

        static Palette GetPalette()
        {
            var palette = new Graph.Palette(16);
            palette[ 0] = new Color { R = 0x02, G = 0x08, B = 0x80 };
            palette[ 1] = new Color { R = 0x10, G = 0x10, B = 0x70 };
            palette[ 2] = new Color { R = 0x20, G = 0x18, B = 0x60 };
            palette[ 3] = new Color { R = 0x30, G = 0x20, B = 0x50 };
            palette[ 4] = new Color { R = 0x40, G = 0x28, B = 0x40 };
            palette[ 5] = new Color { R = 0x50, G = 0x30, B = 0x30 };
            palette[ 6] = new Color { R = 0x60, G = 0x38, B = 0x20 };
            palette[ 7] = new Color { R = 0x70, G = 0x40, B = 0x10 };
            palette[ 8] = new Color { R = 0x80, G = 0x48, B = 0x0e };
            palette[ 9] = new Color { R = 0x90, G = 0x50, B = 0x0c };
            palette[10] = new Color { R = 0xa0, G = 0x58, B = 0x0a };
            palette[11] = new Color { R = 0xb0, G = 0x60, B = 0x08 };
            palette[12] = new Color { R = 0xc0, G = 0x68, B = 0x06 };
            palette[13] = new Color { R = 0xd0, G = 0x70, B = 0x04 };
            palette[14] = new Color { R = 0xe8, G = 0x78, B = 0x02 };
            palette[15] = new Color { R = 0xff, G = 0x80, B = 0x01 };
            return palette;
        }

        static WriteableBitmap DrawMandelbrot(IntRectangle canvasPosition)
        {
            var mandelbrot = new Mandelbrot(position: canvasPosition, backgroundColor: Colors.MidnightBlue);
            mandelbrot.Draw(GetPalette());
            return mandelbrot.Bitmap;
        }
    }
}
実行結果もほぼ変わらない。
2014年02月21日
[Event] de:code
米国サンフラシスコで 4/2 - 4/4 に開催される Build 2014 の内容を凝縮して日本で開催される有償の開発者向けイベント。
3月上旬に登録開始予定。
かつて日本でも Microsoft TechEd という開発者/ITプロ向けの最大級のマイクロソフトの技術に関するカンファレンスが毎年横浜などで開かれていたが、2011年の東日本大震災の影響で開催が延期、その後中止され、それ以降開催されていない。
de:code は、日本での今年最大の開発者向けののマイクロソフトの技術に関するカンファレンスとなるだろう。
2014年02月22日
[Event] MVP Community Camp 2014

昨年まで Community Open Day として全国で一斉に開催されていたマイクロソフト技術の勉強会だが、今年は MVP Community Camp 2014 としてアジア パシフィック全体で行われる。
17日から21日迄はオンライン イベント、22日はオフライン イベントとなる。
私は北陸会場の担当。
MVP Community Camp 2014

2014年3月17日(月)-22日(土)- MVP Community Camp 2014 (英語)
- MVP Community Camp 2014 各都市の申し込みサイト一覧 - Curah!
- MVP Community Camp 2014 東京会場
2014年3月22日(土)
日本マイクロソフト株式会社 品川本社 セミナールーム (品川グランドセントラルタワー 31F)
MVP Community Camp 2014 東京会場
- MVP Community Camp 2014 東京会場
2014年3月22日(土)
日本マイクロソフト株式会社 品川本社 セミナールーム (品川グランドセントラルタワー 31F)
MVP Community Camp 2014 東京会場 リーフレット
MVP Community Camp 2014 北陸会場
| MVP Community Camp 2014 北陸会場 | |
|---|---|
| 会期 | 2014年3月22日(土) |
| 会場 | 石川工業高等専門学校 (石川県河北郡津幡町北中条タ1) 6号館 (トライアル研究センター) 2階講義室 |
| 参加費 | 無料 |
| 主催 | Hokuriku.NET 福井情報技術者協会[FITEA] |
| 協力 | 日本マイクロソフト |
| 詳細/お申込み | MVP Community Camp 2014 北陸会場 - ATND |
MVP Community Camp 2014 北陸会場 リーフレット
参考: 昨年までのイベント
参考: 昨年までの北陸会場
2014年02月23日
[TypeScript][WebGL][Three.js] 3D で遊ぼう ~C#er も TypeScript で楽々 WebGL~ ― 準備編
※ 『Hokuriku.NET Vol.13 in 富山「3D で遊ぼう ~C#er も TypeScript で楽々 WebGL~」』の資料の内容の解説。
今回は、TypeScript を使って WebGL に挑戦してみよう。
素で使うと中々に取っつき難い WebGL だが、TypeScript を使うことで比較的楽に使うことができる。 C#er の方も是非 Web での 3D プログラミングに興味を持っていただきたい。
WebGL とは
WebGL は、HTML5 の Canvas に三次元 (または二次元) のグラフィックを表示する標準仕様だ。
Web ブラウザーで、プラグインなしで動作する。
WebGL 動作環境
現状 WebGL は、PC 上のブラウザーでは、最新の IE、Google Chrome、FireFoxでは、ほぼ動作する。但し全てが動くとは限らない。
モバイルで動作するものは多くない。
モバイル環境の WebGL 対応状況
| Platform | iPhone, iPad | Phones & Tablet | Android 4.0+ | Kindle Fire | Phones | BB10 | Tablet | MeeGo - N9 | Symbian | Windows Phone | Windows 8 | Android & Symbian | Java,iOS Android | Android, MeeGo* | Firefox OS |
| WebGL 3D Canvas for the web |
○ Specific device |
○ 30+ |
○ |
○ 2.0+ |
○ 11+ |
○ 12+ (android) |
○ |
○ |
Windows RT タブレットでは動作する。
WebGL プログラミング
WebGL のプログラミングには、シェーディング言語である GLSL (OpenGL 2.0) と JavaScript を用いる。
次の図のような感じだ。左側が GLSL、右側が JavaScript による部分だ。
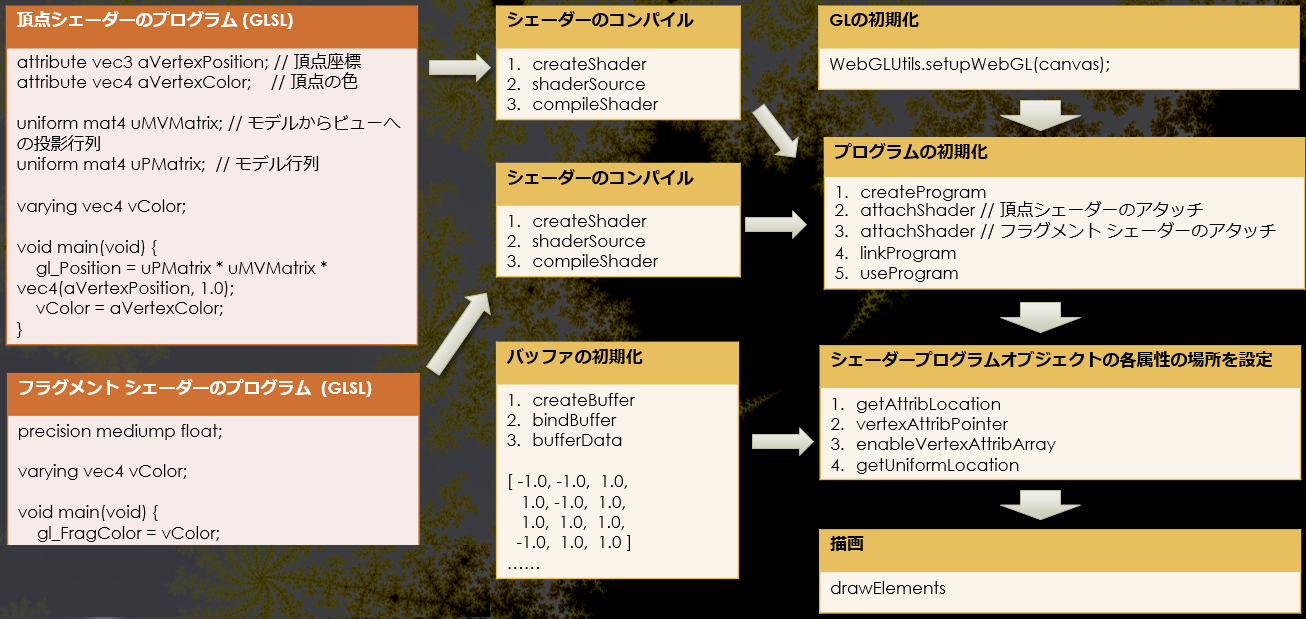
慣れていない人には、結構大変だ。
three.js
そこで、ここでは three.js という JavaScript のライブラリを用いることによる。
three.js は、WebGL のラッパーで、WebGL を抽象化して易しく使えるようにしてくれるのだ。
次の場所で入手することができる。
ダウンロードし、three.js または three.min.js というファイルを HTML ファイルから参照すれば OK だ。
three.d.ts
three.js を TypeScript から使う為には、型定義ファイルの three.d.ts も必要だ。
こちらは、次の場所で入手することができる。
または、NuGet で入手することができる。
Visual Studio で NuGet を検索してインストールすることも可能だ。
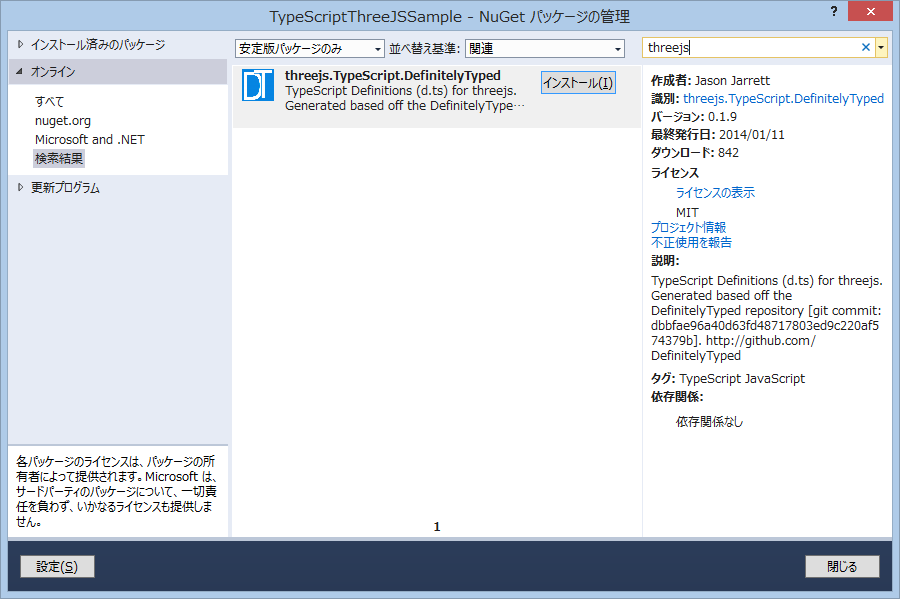
この three.d.ts を自分の TypeScript ファイルから参照する。
three.js による 3D プログラミング
では three.js で 3D プログラミングを始めてみよう。
ここでは、次のような順序で進めていく。
- 0. 準備
- 1. WebGL レンダラーの作成
- 2. カメラの作成
- 3. シーン (空間) の作成
- 3.1 ライト (光源) の作成 → シーンに追加
- 3.2 メッシュの作成 ― ジオメトリー (形) とマテリアル (材料) からメッシュを作成 → シーンに追加
- 4. レンダリング ― レンダラーとカメラでシーンをレンダリング
0. 準備
- 0.1 『[TypeScript] TypeScript の特長』を参考に、Visual Studio で「TypeScript を使用した HTML アプリケーション」を作成する。
- 0.2 three.min.js と three.d.ts をプロジェクトのフォルダーに置く (ここではプロジェクトのフォルダーにその儘フラットに置いている)。
- 0.3 threejswebglsample.ts というファイル名の TypeScript ファイルをプロジェクトに追加する。
- 0.4 threejswebglsample.ts の一行目に、
/// <reference path="three.d.ts"/>
という1行を書き、three.d.ts を参照する
(three.d.ts が threejswebglsample.ts と異なるフォルダーにある場合は、相対パスで書く)。 - 0.5 threejswebglsample.html というファイル名の HTML ファイルをプロジェクトに追加する。
threejswebglsample.html では、three.min.js と threejswebglsample.ts から生成される threejswebglsample.js を参照する。
次のようにする。
<!DOCTYPE html>
<html lang="ja">
<head>
    <meta charset="utf-8" />
    <script src="three.min.js"></script>
    <script src="threejswebglsample.js"></script>
    <title>THREE.js で WebGL</title>
</head>
<body>
    <div id="viewport"></div>
</body>
</html>
中に viewport という id の div があるが、後で three.js によって、この中に Canvas を作る。
1. WebGL レンダラーの作成
レンダラーを作成する TypeScript のコードは次のようになる。
    // 1. WebGL レンダラーを作成
    try { var renderer = new THREE.WebGLRenderer({ antialias: true }); } catch (e) {}
    if (renderer == null) {
        alert("お使いの環境では WebGL はご利用いただけません。");
        return;
    }
    // サイズの設定
    renderer.setSize(window.innerWidth, window.innerHeight);
    // 背景色の設定(色, 透明度)
    renderer.setClearColorHex(0x000000, 1);
    // レンダラーによって、viewport の ID を持つ HTML 要素に子要素として canvas を追加
    document.querySelector("#viewport").appendChild(renderer.domElement);
これで描画する準備ができた。
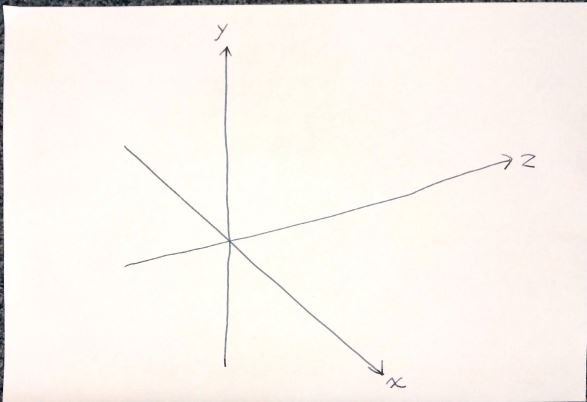
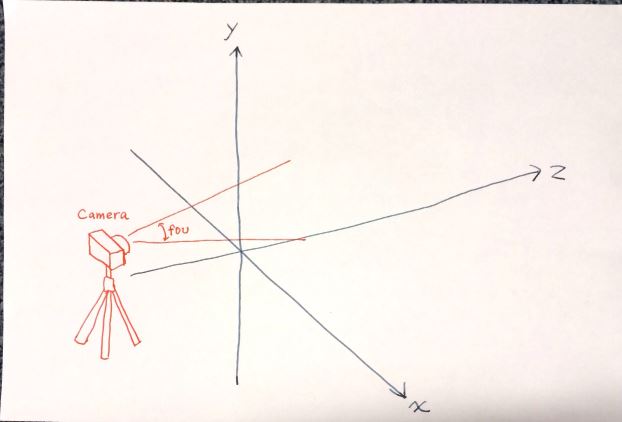
2. カメラの作成
次にカメラを作成する。
     // 2. カメラを作成
    // (透視投影の) カメラを作成
    var fov                   = 100;                                     // 画角
    var aspect                = window.innerWidth / window.innerHeight;  // 縦横比
    var camera                = new THREE.PerspectiveCamera(fov, aspect);
    camera.position           = new THREE.Vector3(0, 0, 1000);           // z 方向に 1000 ずらす
カメラは、z 方向に 1000 ずらした位置に置くことにする。
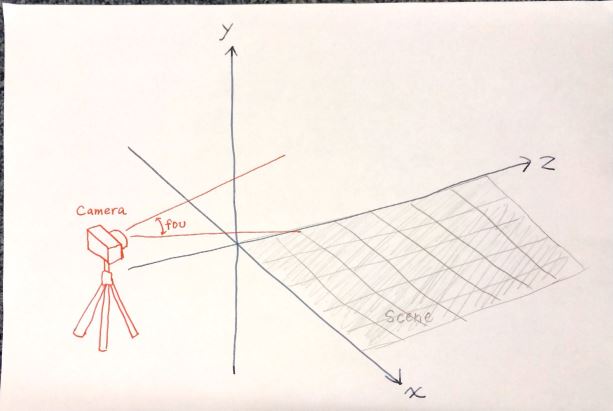
3. シーン (空間) の作成
シーン (空間) を作成する。 シーンには、後でライト (光源) を置いたり、メッシュと呼ばれるオブジェクトを配置したりする。
    // 3. シーン (空間) を作成
    var scene                 = new THREE.Scene();
シーン (空間) が作成された。
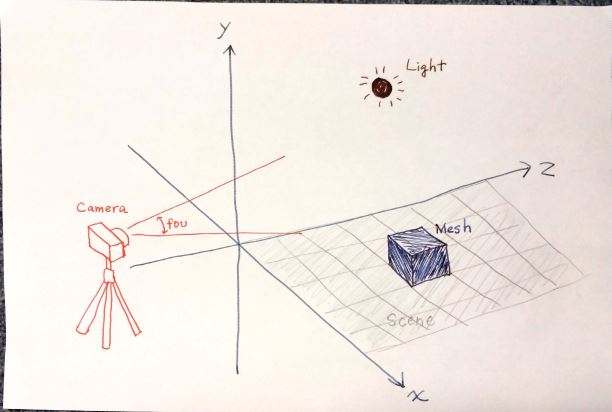
3.1 ライト (光源) の作成 → シーンに追加
ライト (光源) を作成し、シーンに追加する。
ライトには幾つかの種類があるが、ここでは太陽光のような平行光源 (無限遠光源) を作成する。
    // 3.1 ライト (光源) を作成 → シーンに追加
    // 平行光源 (無限遠光源) を作成
    var directionalLight      = new THREE.DirectionalLight(0xffffff, 1); // 引数: 色, 強さ
    directionalLight.position = new THREE.Vector3(0, 0, 1);              // z 方向から照らす
    // 光源をシーンに追加
    scene.add(directionalLight);
シーン (空間) にライト (光源) が置かれた。

3.2 メッシュの作成 ― ジオメトリー (形) とマテリアル (材料) からメッシュを作成 → シーンに追加
ジオメトリー (形) とマテリアル (材料) からメッシュを作成し、シーンに追加する。
three.js では、予めプリミティブ (基本的な) ジオメトリー (形) が幾つか用意されている。ここでは、その中から直方体を作成する。
また、マテリアル (材料) も幾つもの種類が用意されているが、ここでは単純な色だけを持ったものを用いる。
    // 3.2 メッシュを用意 → シーンに追加
    // ジオメトリー (形) とマテリアル (材料) からメッシュを作成

    // プリミティブなジオメトリーを作成
    var geometry = new THREE.CubeGeometry(500, 500, 500);
    // マテリアルを作成 (赤)
    var material = new THREE.MeshLambertMaterial({ color: 0xff0000 });

    // ジオメトリーとマテリアルを合わせてメッシュを作成
    var cubeMesh = new THREE.Mesh(geometry, material);
    // メッシュをシーンに追加
    scene.add(cubeMesh);
これで、シーン (空間) にメッシュが置かれた。
4. レンダリング ― レンダラーとカメラでシーンをレンダリング
最後にレンダリングを行うと描画される。
    // 4. レンダリング - レンダラーとカメラでシーンをレンダリング
    renderer.render(scene, camera);
ここまでをクラスのメソッドに入れ、実行できるようにしてみよう。threejswebglsample.ts は、こうなる。
/// <reference path="three.d.ts"/>

module ThreeJSWebGLSample {
    export class Application {
        static run() {
            // 1. WebGL レンダラーを作成
            try { var renderer = new THREE.WebGLRenderer({ antialias: true }); } catch (e) {}
            if (renderer == null) {
                alert("お使いの環境では WebGL はご利用いただけません。");
                return;
            }
            // サイズの設定
            renderer.setSize(window.innerWidth, window.innerHeight);
            // 背景色の設定(色, 透明度)
            renderer.setClearColorHex(0x000000, 1);
            // レンダラーによって、viewport の ID を持つ HTML 要素に子要素として canvas を追加
            document.querySelector("#viewport").appendChild(renderer.domElement);

            // 2. カメラを作成
            // (透視投影の) カメラを作成
            var fov                   = 100;                                     // 画角
            var aspect                = window.innerWidth / window.innerHeight;  // 縦横比
            var camera                = new THREE.PerspectiveCamera(fov, aspect);
            camera.position           = new THREE.Vector3(0, 0, 1000);           // z 方向に 1000 ずらす

            // 3. シーン (空間) を作成
            var scene                 = new THREE.Scene();

            // 3.1 ライト (光源) を作成 → シーンに追加
            // 平行光源 (無限遠光源) を作成
            var directionalLight      = new THREE.DirectionalLight(0xffffff, 1); // 引数: 色, 強さ
            directionalLight.position = new THREE.Vector3(0, 0, 1);              // z 方向から照らす
            // 光源をシーンに追加
            scene.add(directionalLight);

            // 3.2 メッシュを用意 → シーンに追加
            // ジオメトリー (形) とマテリアル (材料) からメッシュを作成

            // プリミティブなジオメトリーを作成
            var geometry = new THREE.CubeGeometry(500, 500, 500);
            // マテリアルを作成 (赤)
            var material = new THREE.MeshLambertMaterial({ color: 0xff0000 });
            // ジオメトリーとマテリアルを合わせてメッシュを作成
            var cubeMesh = new THREE.Mesh(geometry, material);
            // メッシュをシーンに追加
            scene.add(cubeMesh);

            // 4. レンダリング - レンダラーとカメラでシーンをレンダリング
            renderer.render(scene, camera);
        }
    }
}

// ウィンドウがロードされた時
window.onload = () => {
    // アプリケーションの起動
    ThreeJSWebGLSample.Application.run();
};
実行 その 1
コンパイルして threejswebglsample.js を生成し、threejswebglsample.html を Internet Explorer 11 以降等の WebGL 対応の Web ブラウザーで表示してみよう。
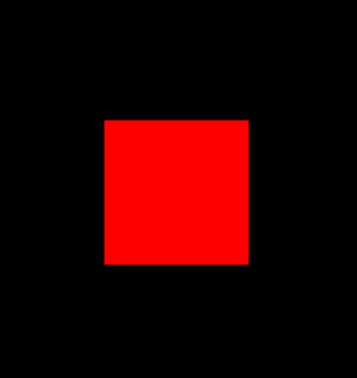
赤い四角形が表示された。
実際には、立方体なのだが、真横から見ている為単なる正方形に見える。
実行 その 2
これでは面白くないので、アニメーションをさせてみよう。
アニメーションをさせる為に次のようなコードでレンダリングしてみる。 メッシュの角度を少しずつ変化させるコードを requestAnimationFrame で再帰的に呼び出す。
これで立方体が少しずつ回転する。
    static rendering(renderer: THREE.Renderer, camera: THREE.Camera, scene: THREE.Scene, cubeMesh: THREE.Mesh) {
        // メッシュを自転
        cubeMesh.rotation.x += 0.01;
        cubeMesh.rotation.y += 0.01;

        // レンダリング
        renderer.render(scene, camera);
        // 繰り返す
        // - setInterval(render, 1000 / 60); より軽い
        // -- 不要な場合にループを行わない
        // -- 最適化されている
        requestAnimationFrame(() => Application.rendering(renderer, camera, scene, cubeMesh));
    }
このコードを追加すると、threejswebglsample.ts 全体は次のようになる。
/// <reference path="three.d.ts"/>

module ThreeJSWebGLSample {
    export class Application {
        static run() {
            // 1. WebGL レンダラーを作成
            try { var renderer = new THREE.WebGLRenderer({ antialias: true }); } catch (e) {}
            if (renderer == null) {
                alert("お使いの環境では WebGL はご利用いただけません。");
                return;
            }
            // サイズの設定
            renderer.setSize(window.innerWidth, window.innerHeight);
            // 背景色の設定(色, 透明度)
            renderer.setClearColorHex(0x000000, 1);
            // レンダラーによって、viewport の ID を持つ HTML 要素に子要素として canvas を追加
            document.querySelector("#viewport").appendChild(renderer.domElement);

            // 2. カメラを作成
            // (透視投影の) カメラを作成
            var fov                   = 100;                                     // 画角
            var aspect                = window.innerWidth / window.innerHeight;  // 縦横比
            var camera                = new THREE.PerspectiveCamera(fov, aspect);
            camera.position           = new THREE.Vector3(0, 0, 1000);           // z 方向に 1000 ずらす

            // 3. シーン (空間) を作成
            var scene                 = new THREE.Scene();

            // 3.1 ライト (光源) を作成 → シーンに追加
            // 平行光源 (無限遠光源) を作成
            var directionalLight      = new THREE.DirectionalLight(0xffffff, 1); // 引数: 色, 強さ
            directionalLight.position = new THREE.Vector3(0, 0, 1);              // z 方向から照らす
            // 光源をシーンに追加
            scene.add(directionalLight);

            // 3.2 メッシュを用意 → シーンに追加
            // ジオメトリー (形) とマテリアル (材料) からメッシュを作成

            // プリミティブなジオメトリーを作成
            var geometry = new THREE.CubeGeometry(500, 500, 500);
            // マテリアルを作成 (赤)
            var material = new THREE.MeshLambertMaterial({ color: 0xff0000 });
            // ジオメトリーとマテリアルを合わせてメッシュを作成
            var cubeMesh = new THREE.Mesh(geometry, material);
            // メッシュをシーンに追加
            scene.add(cubeMesh);

            // 4. レンダリング - レンダラーとカメラでシーンをレンダリング
            Application.rendering(renderer, camera, scene, cubeMesh);
        }

        static rendering(renderer: THREE.Renderer, camera: THREE.Camera, scene: THREE.Scene, cubeMesh: THREE.Mesh) {
            // メッシュを自転
            cubeMesh.rotation.x += 0.01;
            cubeMesh.rotation.y += 0.01;

            // レンダリング
            renderer.render(scene, camera);
            // 繰り返す
            // - setInterval(render, 1000 / 60); より軽い
            // -- 不要な場合にループを行わない
            // -- 最適化されている
            requestAnimationFrame(() => Application.rendering(renderer, camera, scene, cubeMesh));
        }
    }
}

// ウィンドウがロードされた時
window.onload = () => {
    // アプリケーションの起動
    ThreeJSWebGLSample.Application.run();
};
コンパイルして表示してみよう。
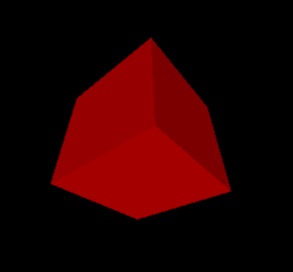
今度は、立方体が回っているのが分かるだろう。
実行 その 3
試しに、マテリアル (材料) を換えてみよう。 例えば、
    // マテリアルを作成 (赤)
    var material = new THREE.MeshLambertMaterial({ color: 0xff0000 });
の部分を、
    // マテリアルを作成 (赤)
    var material = new THREE.MeshPhongMaterial({ color    : 0xff0000,
                                                 specular : 0xcccccc,
                                                 shininess: 50      ,
                                                 ambient  : 0xffffff });
に変えてコンパイルし、表示してみよう。
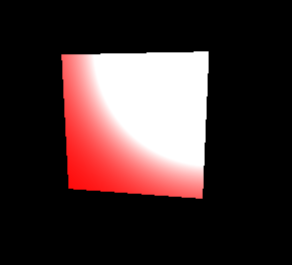
先程のものより艶のある立方体が表示された筈だ。
実際のサンプルを次の場所に用意した。
マテリアル (材料) を変えたり、ジオメトリー (形) を立方体以外にしたり、ライト (証明) を変えたり、アニメーションを変えたり、色々と試してみてほしい。 3D のものが表示されるのは楽しいものだ。
次回は、別のサンプルをご紹介する。