« 2013年06月 | メイン | 2013年09月 »

2013年07月 アーカイブ

2013年07月01日

[C#][dynamic] リフレクション Q&A

Dynamic

「Hokuriku.NET C# メタプログラミング ~リフレクション~」に参加してきた。

Hokuriku.NET C# メタプログラミング ~リフレクション~
日時 2013年6月29日
会場 海みらい図書館 (石川県金沢市)
関連記事

その中で話題になったことから、何点かQ&A形式でご紹介したい。

■ Q. ジェネリックの型情報って取れるの?

A. 取れる。

例えば System.Collections.Generic.Dictionary の型情報を取ってみよう。

using System;
using System.Collections.Generic;

class Program
{
    static void Main()
    {
        // Dictionary<,> の型情報を取得
        Type typeOfDictionary = typeof(Dictionary<,>);
        Console.WriteLine(typeOfDictionary);
    }
}

実行結果は、次のようになる。

System.Collections.Generic.Dictionary`2[TKey,TValue]

この型情報から、型引数を指定した場合の型情報を得るには、次のように MakeGenericType を使う。

using System;
using System.Collections.Generic;

class Program
{
    static void Main()
    {
        // Dictionary<,> の型情報を取得
        Type typeOfDictionary               = typeof(Dictionary<,>);

        // typeOfDictionary に型引数を指定して型情報を取得
        Type typeOfDictionaryOfStringAndInt = typeOfDictionary.MakeGenericType(new Type[] { typeof(string), typeof(int) });
        Console.WriteLine(typeOfDictionaryOfStringAndInt);
    }
}

実行結果:

System.Collections.Generic.Dictionary`2[System.String,System.Int32]

勿論、始めから型引数を指定した場合の型情報と同じになる。

using System;
using System.Collections.Generic;

class Program
{
    static void Main()
    {
        // Dictionary<string, int> の型情報を取得
        Type typeOfDictionaryOfStringAndInt = typeof(Dictionary<string, int>);
        Console.WriteLine(typeOfDictionaryOfStringAndInt);
    }
}

実行結果:

System.Collections.Generic.Dictionary`2[System.String,System.Int32]

■ Q. プロパティって内部的にはメソッドなの?

A. その通り。プロパティでもある。

リフレクションを使って、プロパティを持ったクラスのメンバーを調べてみよう。

using System;
using System.Reflection;

// プロパティ Name を持つクラス Person (Object クラスから派生)
class Person // : Object
{
    public string Name { get; set; }
}

class Program
{
    static void Main()
    {
        // Person の型情報を取得
        Type         type        = typeof(Person);

        // Person の型情報から、Person の全メンバーの情報を取得
        MemberInfo[] memberInfos = type.GetMembers();

        // 各メンバー情報の名前と種類を表示
        foreach (MemberInfo member in memberInfos)
            Console.WriteLine("Name: {0}, MemberType: {1}", member.Name, member.MemberType);
    }
}

Type.GetMembers メソッドを使い、全メンバーの情報を取得し、各メンバー情報の名前と種類を表示させてみる。

実行してみると、次のように Person とそのベースクラスである Object の、public なメンバーがリストアップされる:

Name: get_Name, MemberType: Method
Name: set_Name, MemberType: Method
Name: ToString, MemberType: Method
Name: Equals, MemberType: Method
Name: GetHashCode, MemberType: Method
Name: GetType, MemberType: Method
Name: .ctor, MemberType: Constructor
Name: Name, MemberType: Property

プロパティとして Name、そのアクセサー メソッドとして get_Name と set_Name があるのが判る。

次のように、プロパティ Name から、アクセサー メソッドを取り出してみることもできる。

using System;
using System.Reflection;

// プロパティ Name を持つクラス Person
class Person
{
    public string Name { get; set; }
}

class Program
{
    static void Main()
    {
        // Person の型情報を取得
        Type         type         = typeof(Person);

        // Person の型情報から、プロパティ Name の情報を取得
        PropertyInfo propertyInfo = type.GetProperty("Name");
        Console.WriteLine(propertyInfo);

        // プロパティ Name の情報から、アクセサー メソッド (getter と setter) の情報を取得
        MethodInfo[] methodInfos  = propertyInfo.GetAccessors();

        // アクセサー メソッド (getter と setter) の情報を表示
        foreach (MethodInfo methodInfo in methodInfos)
            Console.WriteLine(methodInfo);
    }
}

実行結果:

System.String Name
System.String get_Name()
Void set_Name(System.String)

つまり、プロパティ Name があるときには、内部的にアクセサーとして get_Name と set_Name メソッドを持つことになる。

これは、単に get_Name と set_Name メソッドを持つのとは異なる。Name というプロパティも持つことになる。

class Person
{
    public string Name { get; set; } // プロパティ Name (アクセサーとして get_Name と set_Name メソッドも持つことになる)
}

と異なり、

class Person
{
    public string get_Name(           ) { return null; } 
    public void   set_Name(string name) {              }
}

では、get_Name と set_Name メソッドを持つことは同じだが、Name プロパティを持たない。

■ Q. Name プロパティがあるときに内部的にアクセサーとして get_Name と set_Name メソッドを持つのだとすると、Name プロパティがあるときは、get_Name という名前や set_Name という名前のメソッドは作れない?

A. そう、作れない。コンパイル エラーになる。

次のコードをコンパイルしてみると、コンパイル エラーになる。

class Person
{
    public string Name { get; set; } // プロパティ Name

    public string get_Name(           ) { return null; } 
    public void   set_Name(string name) {              }
}

コンパイル結果:

  • エラー 1 型 'Person' は、'get_Name' と呼ばれるメンバーを同じパラメーターの型で既に予約しています。
  • エラー 2 型 'Person' は、'set_Name' と呼ばれるメンバーを同じパラメーターの型で既に予約しています。

■ Q. プロパティが内部的にメソッドだとすると、リフレクションでその内部的なメソッドを実行してもプロパティの値の設定/取得ができる?

A. できる。

先ずは、リフレクションを使って、プロパティに値を設定/取得してみる。

using System;
using System.Reflection;

// プロパティ Name を持つクラス Person
class Person
{
    public string Name { get; set; }
}

class Program
{
    static void Main()
    {
        // Person の型情報を取得
        Type         type         = typeof(Person);

        var          person       = new Person();
        PropertyInfo propertyInfo = type.GetProperty("Name");

        // リフレクションを使って、person の Name の値を設定
        propertyInfo.SetValue(person, "明智光秀", null); // .NET 4.5 未満の場合
        // .NET 4.5 以上の場合は propertyInfo.SetValue(person, "明智光秀"); でも良い

        // リフレクションを使って、person の Name の値を取得
        string       name         = (string)propertyInfo.GetValue(person, null); // .NET 4.5 未満の場合
        // .NET 4.5 以上の場合は string name = (string)propertyInfo.GetValue(person); でも良い

        Console.WriteLine(name);
    }
}

実行結果:

明智光秀

次に、リフレクションを使い、内部的な set_Name メソッドで値を設定し、Name プロパティで値を取得してみる。

using System;
using System.Reflection;

// プロパティ Name を持つクラス Person
class Person
{
    public string Name { get; set; }
}

class Program
{
    static void Main()
    {
        // Person の型情報を取得
        Type         type         = typeof(Person);

        var          person       = new Person();

        // リフレクションを使って、person の set_Name を呼び出す
        MethodInfo   methodInfo   = type.GetMethod("set_Name");
        methodInfo.Invoke(person, new object[] { "織田信長" });

        // リフレクションを使って、person の Name の値を取得
        PropertyInfo propertyInfo = type.GetProperty("Name");
        string       name         = (string)propertyInfo.GetValue(person, null); // .NET 4.5 未満の場合
        // .NET 4.5 以上の場合は string name = (string)propertyInfo.GetValue(person); でも良い

        Console.WriteLine(name);
    }
}

実行結果:

織田信長

このように、プロパティの内部的なメソッドをリフレクションを使って実行することで、プロパティの値の設定/取得ができる。

勿論、リフレクションを使わずに、直接 set_Name や get_Name を呼び出すことはできない。

using System;
using System.Reflection;

// プロパティ Name を持つクラス Person
class Person
{
    public string Name { get; set; }
}

class Program
{
    static void Main()
    {
        var person = new Person();
        person.set_Name("石田光成"); // コンパイル エラーになる
    }
}

コンパイル結果:

  • エラー 1 'Person.Name.set': 演算子またはアクセサーを明示的に呼び出すことはできません。

■ Q. リフレクションで static なメンバーや private なメンバーにもアクセスできる?

A. できる。

次の static メンバーや private メンバーを持つクラス Singleton で、試してみよう。

using System;
using System.Reflection;

// static メンバーや private メンバーを持つクラス
class Singleton
{
    private static Singleton instance = new Singleton();

    public static Singleton GetInstance()
    { return instance; }

    private Singleton()
    {}
}

class Program
{
    static void Main()
    {
        // Singleton の型情報を取得
        Type            type            = typeof(Singleton);

        // BindingFlags.NonPublic | BindingFlags.Instance を指定することで、public でも static でもないコンストラクターの情報を取得
        ConstructorInfo constructorInfo = type.GetConstructor(BindingFlags.NonPublic | BindingFlags.Instance, null, new Type[] { }, null);

        // リフレクションを使うことで、private なコンストラクターが実行できる
        Singleton       singleton       = (Singleton)constructorInfo.Invoke(null);

        // BindingFlags.NonPublic | BindingFlags.Static を指定することで、public でなく static なフィールドの情報を取得
        FieldInfo       fieldInfo       = type.GetField("instance", BindingFlags.NonPublic | BindingFlags.Static);

        // リフレクションを使うことで、private で static なフィールドにアクセスできる
        fieldInfo.SetValue(null, singleton);
    }
}

■ Q. const なフィールドって static なフィールドとしてリフレクションでアクセスできる? まさかと思うけど値を書き換えられる?

A. const なフィールドは static なフィールドとしてリフレクションで値を取得できるが、書き換えられる訳ではない。

試してみよう:

using System;
using System.Reflection;

class ConstantSample
{
    public const double PI = 3.14159265358979 ; // const なフィールド
}

class Program
{
    static void Main()
    {
        // Constant の型情報を取得
        Type      type        = typeof(ConstantSample);

        // Constant の型情報から、const なフィールド PI の情報を取得
        FieldInfo piFieldInfo = type.GetField("PI");

        // インスタンスを指定せずに static フィールドとして値を取得してみる
        var       pi          = (double)piFieldInfo.GetValue(null);
        Console.WriteLine(pi);

        // インスタンスを指定せずに static フィールドとして値を設定してみる
        piFieldInfo.SetValue(null, 3.0);
    }
}

実行してみると、次のように、PI の値を取得することはできるが、設定ではエラーになる:

3.14159265358979

ハンドルされていない例外: System.FieldAccessException: 定数フィールドを設定できません。

■ Q. じゃあ readonly なフィールドは?

A. readonly なフィールドの場合は、const なフィールドの場合と異なり、static としてなければインスタンス フィールドになる。また、値を取得するだけでなく設定することもできる。

readonly なフィールドの場合について試してみよう。

using System;
using System.Reflection;

class ReadonlySample
{
    public readonly int DayOfYear = DateTime.Now.DayOfYear; // readonly なフィールド
}

class Program
{
    static void Main()
    {
        // Readonly の型情報を取得
        Type      type               = typeof(ReadonlySample);

        // Readonly の型情報から、readonly なフィールド DayOfYear の情報を取得
        FieldInfo dayOfYearFieldInfo = type.GetField("DayOfYear");

        // インスタンスを指定せずに static フィールドとして値を取得してみると、これは実行時エラーとなり取得できない
        //var     dayOfYear          = (int)dayOfYearFieldInfo.GetValue(null); // 実行時エラー

        // Readonly のインスタンスを生成
        var       readonlySample     = new ReadonlySample();
        // インスタンスを指定してインスタンス フィールドとして値を取得してみる
        var       dayOfYear          = (int)dayOfYearFieldInfo.GetValue(readonlySample);
        Console.WriteLine(dayOfYear);

        // インスタンスを指定してインスタンス フィールドとして値を設定してみる
        dayOfYearFieldInfo.SetValue(readonlySample, 0);
        // 設定されたか確認
        Console.WriteLine(readonlySample.DayOfYear); 
    }
}

実行結果は次の通り:

182
0

取得だけでなく、設定も可能だ。

2013年07月02日

Microsoft MVP for Visual C# を再受賞しました

IMG_3513.JPG

Microsoft MVP (Most Valuable Professional) for Visual C# を再受賞しました。2005年7月からの受賞で、9年目になります。

ここでも述べましたが、オンライン・オフラインで多くの素晴らしいエンジニアの皆様と出会えたおかげです。感謝です。

今後ともどうぞよろしくお願いいたします。

2013年07月23日

こみゅぷらす Tech Aid 2013

こみゅぷらす Tech Aid 2013
『こみゅぷらす Tech Aid 2013』
こみゅぷらすの飲み放題イベント2013!!
日時 2013年7月27日(土)
11時~18時
会場 新宿居酒屋
参加費 3100円 (ランチ、飲み放題付き)
内容/申込み http://comuplus.net/CLT2013/

Hokuriku.NET Vol.12

Hokuriku.NET
『Hokuriku.NET Vol.12』
~今年の夏も福井で~
日時 2013年8月3日(土)
10時30分~18時
会場 福井市地域交流プラザ 研修室603 (AOSSA 6階) (福井県福井市手寄1-4-1)
参加費 500円 (会場費)
内容/申込み http://atnd.org/events/40509

2013年07月25日

[C#][Windows ストア アプリ][WPF] INotifyPropertyChanged の実装に便利なクラスとコードスニペット

WPF や Silverlight、Windows 8 や Windows RT の Windows ストア アプリでは、UI の記述に XAML を使うことが多い。

そして、データバインドするために INotifyPropertyChanged をしょっちゅう実装することになる。

これが結構面倒なので、開発者は普通、少しでも楽になるような工夫をしている。

そのような「有り勝ちな工夫」について。

■ 工夫する前のコード

「工夫」する前のコードは、こんな感じだ。

using System.ComponentModel;

class MyViewModel : INotifyPropertyChanged
{
    public event PropertyChangedEventHandler PropertyChanged;

    int id = 0;

    public int Id
    {
        get { return id; }
        set {
            if (value != id) {
                id = value;
                if (PropertyChanged != null)
                    PropertyChanged(this, new PropertyChangedEventArgs("Id"));
            }
        }
    }

    string name = string.Empty;

    public string Name
    {
        get { return name; }
        set {
            if (value != name) {
                name = value;
                if (PropertyChanged != null)
                    PropertyChanged(this, new PropertyChangedEventArgs("Name"));
            }
        }
    }
}

プロパティ毎の記述が、結構煩雑だ。

上記ではプロパティが2つしかないが、プロパティが多くなれば、この繰り返しはそれに比例して増えることになる。

■ ヘルパー クラス

Expression や Caller Info を使ったヘルパー クラスを用意するともう少し記述が楽になる。

※ 参考:

こんな感じのヘルパー クラスだ。

using System;
using System.ComponentModel;
using System.Linq.Expressions;
using System.Runtime.CompilerServices;

public static class PropertyChangedEventHandlerExtensions
{
    // Caller Info を使っているので C# 5.0 以降
    public static void Raise(this PropertyChangedEventHandler onPropertyChanged, object sender, [CallerMemberName] string propertyName = "")
    {
        if (onPropertyChanged != null)
            onPropertyChanged(sender, new PropertyChangedEventArgs(propertyName));
    }

    public static void Raise<PropertyType>(this PropertyChangedEventHandler onPropertyChanged, object sender, Expression<Func<PropertyType>> propertyExpression)
    { onPropertyChanged.Raise(sender, propertyExpression.GetMemberName()); }

    static string GetMemberName<MemberType>(this Expression<Func<MemberType>> expression)
    { return ((MemberExpression)expression.Body).Member.Name; }
}

これを使うことで、先のコードは「少しだけ」簡潔になる。また、プロパティ名の変更に対して安全になった。

using System.ComponentModel;

class MyViewModel : INotifyPropertyChanged
{
    public event PropertyChangedEventHandler PropertyChanged;

    int id = 0;

    public int Id
    {
        get { return id; }
        set {
            if (value != id) {
                id = value;
                PropertyChanged.Raise(this);
            }
        }
    }

    string name = string.Empty;

    public string Name
    {
        get { return name; }
        set {
            if (value != name) {
                name = value;
                PropertyChanged.Raise(this);
            }
        }
    }
}

■ コード スニペット

更に Visual Studio でコード スニペットを利用することで、タイピングの手間を減らすことができる。

このコード スニペットは、例えば次のような XML だ。

<?xml version="1.0" encoding="utf-8" ?>
<CodeSnippets xmlns="http://schemas.microsoft.com/VisualStudio/2005/CodeSnippet">
	<CodeSnippet Format="1.0.0">
	<Header>
		<Title>Property for INotifyPropertyChanged</Title>
		<Shortcut>propin</Shortcut>
		<Description>Code snippet for property for INotifyPropertyChanged.
Use this class (for C# 5.0 or later):
    using System.ComponentModel;
    using System.Runtime.CompilerServices;

    public static class PropertyChangedEventHandlerExtensions 
    {
        public static void Raise(this PropertyChangedEventHandler onPropertyChanged, object sender, [CallerMemberName] string propertyName = "")
        {
            if (onPropertyChanged != null)
                onPropertyChanged(sender, new PropertyChangedEventArgs(propertyName));
        }
    }</Description>
			<Author></Author>
			<SnippetTypes>
				<SnippetType>Expansion</SnippetType>
			</SnippetTypes>
		</Header>
		<Snippet>
			<Declarations>
				<Literal>
					<ID>type</ID>
					<ToolTip>type name</ToolTip>
					<Default>int</Default>
				</Literal>
				<Literal>
					<ID>field</ID>
					<ToolTip>field name</ToolTip>
					<Default>myField</Default>
				</Literal>
				<Literal>
					<ID>property</ID>
					<ToolTip>property name</ToolTip>
					<Default>MyProperty</Default>
				</Literal>
			</Declarations>
			<Code Language="csharp"><![CDATA[ $type$ $field$ = default($type$);

		public $type$ $property$
		{
			get { return $field$; }
			set {
				if (!value.Equals($field$)) {
					$field$ = value;
					PropertyChanged.Raise(this);
				}
			}
		}
$end$]]></Code>
		</Snippet>
	</CodeSnippet>
</CodeSnippets>

これを、"propin.snippet" のような名前で、テキスト ファイルとして任意の場所に保存する。

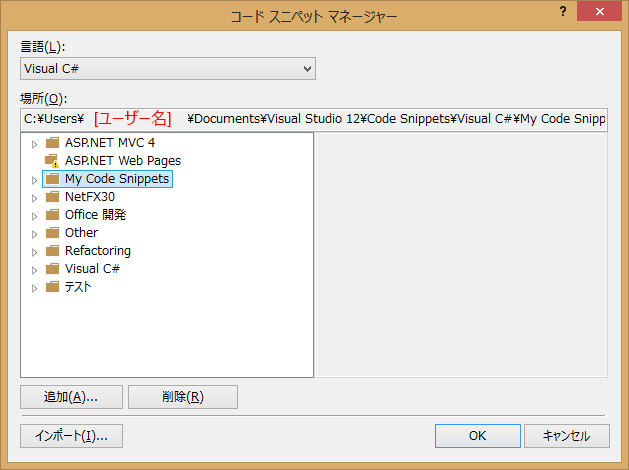
次に、Visual Studio で、メニューから 「ツール」 - 「コード スニペット マネージャー」を開く。

コード スニペット マネージャー
コード スニペット マネージャー

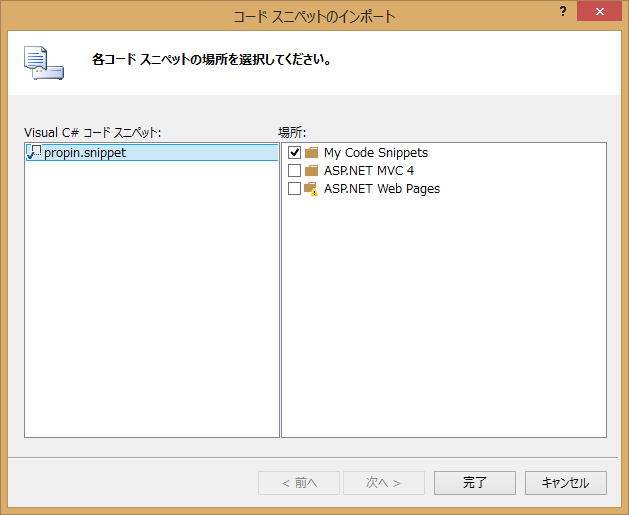
「インポート」ボタンを押す。先ほどのテキスト ファイル "propin.snippet" を選択する。

コード スニペットのインポート
コード スニペットのインポート

"My Code Snippets" にチェックをいれて、「完了」ボタンを押す。

これでコード スニペットが使えるようになる。

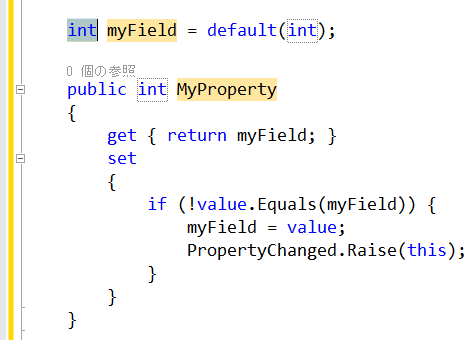
例えば、先程の MyViewModel クラスの Name プロパティの下にカーソルを合わせて、propin とタイプして[TAB]キーを2回押してみよう。

新しいプロパティが簡単に挿入でき、型名、フィールド名、プロパティ名が楽に設定できるだろう。

コード スニペットによるプロパティの追加

2013年07月27日

[C#][Roslyn] Roslyn による Visual Studio のアドイン

Roslyn Cafe

※ この内容は、『こみゅぷらす Tech Aid 2013』 (2013-07-27 新宿,東京) にて実際のデモと共に発表予定。

■ Roslyn について

Roslyn は、C# や Visual Basic のコンパイラーの内部の API 等を公開したものだ。"Compiler as a Service" と表現されている。

現在、次の場所や NuGet で入手可能だ。

コンパイラーのコード解析部分等の機能が公開されている。

次にあげる Channel 9 のビデオと資料が参考になるだろう。

Channel 9 にある Roslyn 関連ビデオ (古い順)

Roslyn には次にあげるような機能がある。

Roslyn の機能

  • C# や Visual Basic のソースコード解析機能
  • Visual Studio の拡張機能
  • C#スクリプト機能

今回は、この中の「ソースコード解析機能」を用いて、簡単な Visual Studio のアドインを作ってみたい。

C# のソースコードを解析して、識別子等を数えて、それを WPF で作成したウィンドウに表示させてみよう。

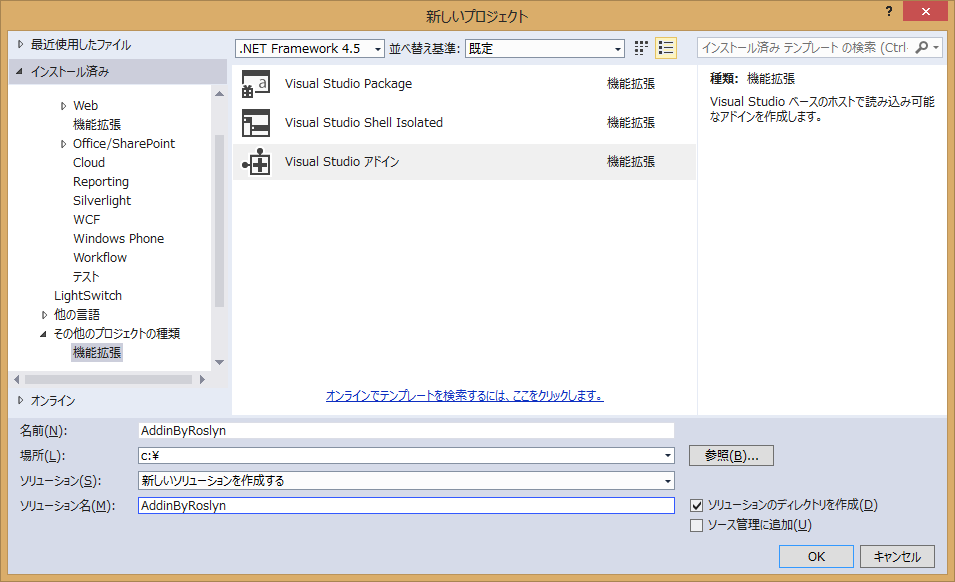
■ 「Visual Studio アドイン」プロジェクトの新規作成

先ず、Visual Studio を用いて、「Visual Studio アドイン」プロジェクトを新規作成する。

「Visual Studio アドイン」プロジェクトの新規作成

次に Roslyn をインストールし、このプロジェクトから参照する。

NuGet を使うことで、簡単にこの作業を行うことができる。

「ソリューション エクスプローラー」でプロジェクト名を右クリックし、「NuGet パッケージの管理...」を選択する。

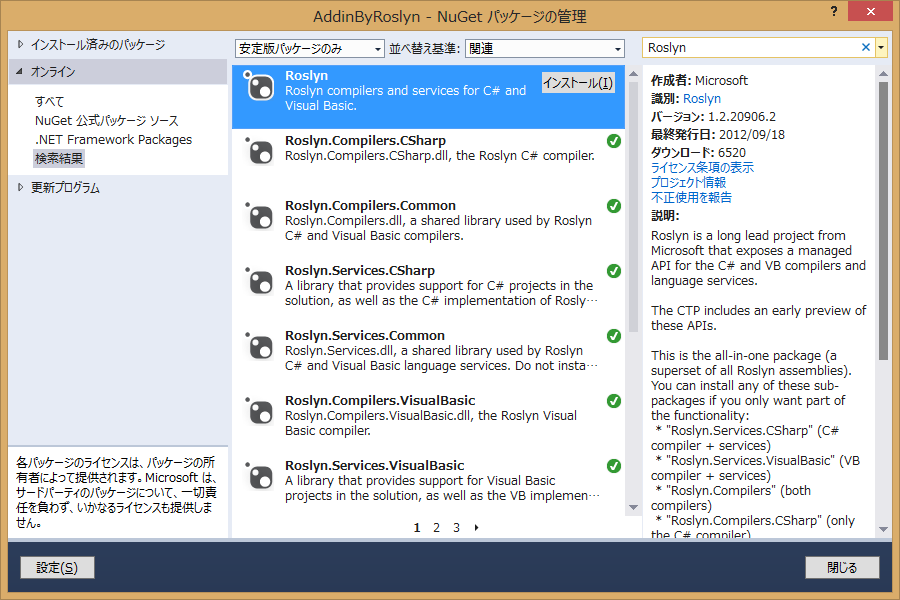
「NuGet パッケージの管理」ダイアログ ボックスが現れるので、次のように「オンラインの検索」で、"Roslyn" を検索し、"Roslyn" を選択して「インストール」する。

NuGet による Roslyn の追加

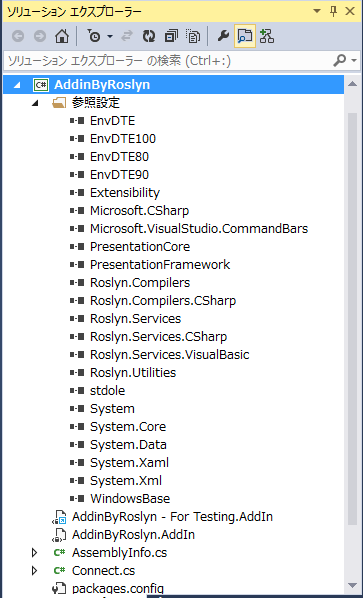
Roslyn の追加後のプロジェクトの参照設定は、次のようになる。

Roslyn の追加後のプロジェクトの参照設定

■ ViewModel の作成

今回は、WPF を使ってウィンドウを出すことにする。

そのウィンドウ用に、次のような ViewModel を用意した。

ソースコード内の識別子や using、クラス等の数を保持するクラスだ。

※ 実装の参考:

using System;
using System.ComponentModel;
using System.Linq.Expressions;
using System.Runtime.CompilerServices;

namespace AddinByRoslyn
{
    public static class PropertyChangedEventHandlerExtensions
    {
        public static void Raise(this PropertyChangedEventHandler onPropertyChanged, object sender, [CallerMemberName] string propertyName = "")
        {
            if (onPropertyChanged != null)
                onPropertyChanged(sender, new PropertyChangedEventArgs(propertyName));
        }

        public static void Raise<PropertyType>(this PropertyChangedEventHandler onPropertyChanged, object sender, Expression<Func<PropertyType>> propertyExpression)
        { onPropertyChanged.Raise(sender, propertyExpression.GetMemberName()); }

        static string GetMemberName<MemberType>(this Expression<Func<MemberType>> expression)
        { return ((MemberExpression)expression.Body).Member.Name; }
    }

    public class ViewModel : INotifyPropertyChanged
    {
        public event PropertyChangedEventHandler PropertyChanged;

        int identifierCount = 0;

        public int IdentifierCount
        {
            get { return identifierCount; }
            set {
                if (value != identifierCount) {
                    identifierCount = value;
                    PropertyChanged.Raise(this);
                    RaiseUpdateData();
                }
            }
        }

        int usingCount = 0;

        public int UsingCount
        {
            get { return usingCount; }
            set {
                if (value != usingCount) {
                    usingCount = value;
                    PropertyChanged.Raise(this);
                    RaiseUpdateData();
                }
            }
        }

        int classCount = 0;

        public int ClassCount
        {
            get { return classCount; }
            set {
                if (value != classCount) {
                    classCount = value;
                    PropertyChanged.Raise(this);
                    RaiseUpdateData();
                }
            }
        }

        int fieldCount = 0;

        public int FieldCount
        {
            get { return fieldCount; }
            set {
                if (value != fieldCount) {
                    fieldCount = value;
                    PropertyChanged.Raise(this);
                    RaiseUpdateData();
                }
            }
        }

        int propertyCount = 0;

        public int PropertyCount
        {
            get { return propertyCount; }
            set {
                if (value != propertyCount) {
                    propertyCount = value;
                    PropertyChanged.Raise(this);
                    RaiseUpdateData();
                }
            }
        }

        int methodCount = 0;

        public int MethodCount
        {
            get { return methodCount; }
            set {
                if (value != methodCount) {
                    methodCount = value;
                    PropertyChanged.Raise(this);
                    RaiseUpdateData();
                }
            }
        }

        int variableCount = 0;

        public int VariableCount
        {
            get { return variableCount; }
            set {
                if (value != variableCount) {
                    variableCount = value;
                    PropertyChanged.Raise(this);
                    RaiseUpdateData();
                }
            }
        }

        int ifCount = 0;

        public int IfCount
        {
            get { return ifCount; }
            set {
                if (value != ifCount) {
                    ifCount = value;
                    PropertyChanged.Raise(this);
                    RaiseUpdateData();
                }
            }
        }

        int lambdaCount = 0;

        public int LambdaCount
        {
            get { return lambdaCount; }
            set {
                if (value != lambdaCount) {
                    lambdaCount = value;
                    PropertyChanged.Raise(this);
                    RaiseUpdateData();
                }
            }
        }

        public object Data
        {
            get {
                return new [] {
                    new { 名称 = "識別子の数" , 結果 = IdentifierCount },
                    new { 名称 = "using の数" , 結果 = UsingCount },
                    new { 名称 = "クラスの数" , 結果 = ClassCount },
                    new { 名称 = "フィールドの数", 結果 = FieldCount },
                    new { 名称 = "プロパティの数", 結果 = PropertyCount },
                    new { 名称 = "メソッドの数" , 結果 = MethodCount },
                    new { 名称 = "変数の数" , 結果 = VariableCount },
                    new { 名称 = "if の数" , 結果 = IfCount },
                    new { 名称 = "ラムダ式の数" , 結果 = LambdaCount }
                };
            }
        }

        string result = string.Empty;

        public string Result
        {
            get { return result; }
            set {
                if (value != result) {
                    result = value;
                    PropertyChanged.Raise(this);
                }
            }
        }

        public void Clear()
        {
            IdentifierCount =
            UsingCount =
            ClassCount =
            FieldCount =
            PropertyCount =
            MethodCount =
            VariableCount =
            IfCount =
            LambdaCount = 0;
            Result = string.Empty;
        }

        void RaiseUpdateData()
        { PropertyChanged.Raise(this, () => Data); }
    }
}

■ Roslyn を用いたコード解析部の作成

では、Roslyn を用いたコード解析部を作成してみよう。

ここでは、Roslyn にある Roslyn.Compilers.CSharp.SyntaxWalker というクラスを継承して SyntaxCounter というクラスを作成する。

この SyntaxWalker クラスは、Visitor パターンになっていて、Visit メソッドを呼ぶことで、全ノードを辿り、ノードの種類毎の virtual メソッドを呼んでくれる。

例えば、識別子のノードの場合には、VisitIdentifierName という virtual メソッドが呼ばれる。

それぞれの virtual メソッドをオーバーライドすることで、そこに処理を書くことができる訳だ。

SyntaxCounter では、オーバーライドしたメソッドのそれぞれで呼ばれた回数を数えることで、ソースコード内の、識別子や using、クラス等の数を知ることにする。

using Roslyn.Compilers.CSharp;
using System.IO;
using System.Text;

namespace AddinByRoslyn
{
    class SyntaxCounter : SyntaxWalker
    {
        readonly ViewModel viewModel;
        StringBuilder stringBuilder; // viewModel.Result 用

        public SyntaxCounter(ViewModel viewModel)
        { this.viewModel = viewModel; }

        // ソース ファイルの中を解析
        public void AnalyzeSourceFile(string sourceFileName)
        {
            using (var reader = new StreamReader(sourceFileName, false)) {
                var sourceCode = reader.ReadToEnd();
                Analyze(sourceCode);
            }
        }

        // ソース コードの中を解析
        void Analyze(string sourceCode)
        {
            // Roslyn.Compilers.CSharp.SyntaxTree クラスによるシンタックス ツリーの取得
            var tree = SyntaxTree.ParseText(sourceCode);
            Analyze(tree.GetRoot()); // シンタックス ツリーのルート要素を解析
        }

        // ルート要素の中を解析
        void Analyze(CompilationUnitSyntax root)
        {
            viewModel.Clear();
            stringBuilder = new StringBuilder();
            Visit(root); // Visit メソッドにより、全ノードを辿る (Visitor パターン)
            viewModel.Result = stringBuilder.ToString();
        }

        // 全ノードについて
        public override void DefaultVisit(SyntaxNode node)
        {
            base.DefaultVisit(node);
            // ノードの情報を stringBuilder に追加
            stringBuilder.AppendLine(string.Format("NodeType: {0}, Node: {1}", node.GetType().Name, node.GetText()));
        }

        // 識別子のノードの場合
        public override void VisitIdentifierName(IdentifierNameSyntax node)
        {
            base.VisitIdentifierName(node);
            viewModel.IdentifierCount++; // 識別子を数える
        }

        // using のノードの場合
        public override void VisitUsingDirective(UsingDirectiveSyntax node)
        {
            base.VisitUsingDirective(node);
            viewModel.UsingCount++; // using を数える
        }

        // クラスのノードの場合
        public override void VisitClassDeclaration(ClassDeclarationSyntax node)
        {
            base.VisitClassDeclaration(node);
            viewModel.ClassCount++; // クラスを数える
        }

        // フィールドのノードの場合
        public override void VisitFieldDeclaration(FieldDeclarationSyntax node)
        {
            base.VisitFieldDeclaration(node);
            viewModel.FieldCount++; // フィールドを数える
        }

        // プロパティのノードの場合
        public override void VisitPropertyDeclaration(PropertyDeclarationSyntax node)
        {
            base.VisitPropertyDeclaration(node);
            viewModel.PropertyCount++; // プロパティを数える
        }

        // メソッドのノードの場合
        public override void VisitMethodDeclaration(MethodDeclarationSyntax node)
        {
            base.VisitMethodDeclaration(node);
            viewModel.MethodCount++; // メソッドを数える
        }

        // 変数のノードの場合
        public override void VisitVariableDeclaration(VariableDeclarationSyntax node)
        {
            base.VisitVariableDeclaration(node);
            viewModel.VariableCount++; // 変数を数える
        }

        // if のノードの場合
        public override void VisitIfStatement(IfStatementSyntax node)
        {
            base.VisitIfStatement(node);
            viewModel.IfCount++; // if を数える
        }

        // シンプルなラムダ式のノードの場合
        public override void VisitSimpleLambdaExpression(SimpleLambdaExpressionSyntax node)
        {
            base.VisitSimpleLambdaExpression(node);
            viewModel.LambdaCount++; // ラムダ式を数える
        }

        // 括弧付きのラムダ式のノードの場合
        public override void VisitParenthesizedLambdaExpression(ParenthesizedLambdaExpressionSyntax node)
        {
            base.VisitParenthesizedLambdaExpression(node);
            viewModel.LambdaCount++; // ラムダ式を数える
        }
    }
}

■ View の作成

次に View を追加する。プロジェクトに "View" という名前の WPF のウィンドウを一つ追加する。

この View は、先の ViewModel を表示するためのウィンドウだ。

プロジェクトに System.Xaml への参照設定の追加が必要になる。

View.xaml

XAML の Grid 内に、ViewModel の "Result" を表示するための TextBox と "Data" を表示するための DataGrid を追加しておく。

<Window x:Class="AddinByRoslyn.View"
        xmlns="http://schemas.microsoft.com/winfx/2006/xaml/presentation"
        xmlns:x="http://schemas.microsoft.com/winfx/2006/xaml"
        xmlns:mc="http://schemas.openxmlformats.org/markup-compatibility/2006" 
        xmlns:d="http://schemas.microsoft.com/expression/blend/2008" 
        mc:Ignorable="d" 
        d:DesignHeight="500" d:DesignWidth="500">
    <Grid>
        <Grid.RowDefinitions>
            <RowDefinition Height="*"/>
            <RowDefinition Height="*"/>
        </Grid.RowDefinitions>
        <TextBox TextWrapping="Wrap" Text="{Binding Path=Result}" Grid.RowSpan="2" FontFamily="Meiryo" FontSize="14" IsReadOnlyCaretVisible="True" VerticalScrollBarVisibility="Auto" />
        <DataGrid Grid.Row="1" ItemsSource="{Binding Path=Data}" FontFamily="Meiryo" FontSize="14" />
    </Grid>
</Window>
View の「デザイン」
View の「デザイン」

View.xaml.cs

View の C# 部分では、ViewModel のインスタンスを保持し、それを DataContext とする。

また、コンストラクターで C# のソース ファイル名を受け取り、それを上で作成した SyntaxCounter クラスを使って解析する。

using System.Windows;

namespace AddinByRoslyn
{
    public partial class View : Window
    {
        ViewModel viewModel = new ViewModel();

        public View(string sourceFileName)
        {
            InitializeComponent();
            DataContext = viewModel; // DataContext に ViewModel のインスタンスを設定

            if (!string.IsNullOrWhiteSpace(sourceFileName))
                // SyntaxCounter クラスを用いたソース ファイルの解析
                new SyntaxCounter(viewModel).AnalyzeSourceFile(sourceFileName);
        }
    }
}

■ Visual Studio アドイン部

最後に、Visual Studio アドイン部のコードをカスタマイズする。

カスタマイズするのは、プロジェクトの新規作成時に自動生成された Connect.cs だ。

Exec というメソッドがあるので、この中で View を作成し、ソースコード ファイル名を渡すようにする。

using EnvDTE;
using EnvDTE80;
using Extensibility;
using Microsoft.VisualStudio.CommandBars;
using System;

namespace AddinByRoslyn
{
    public class Connect : IDTExtensibility2, IDTCommandTarget
    {
        DTE2 _applicationObject = null;
        AddIn _addInInstance = null;

        public void OnConnection(object application, ext_ConnectMode connectMode, object addInInst, ref Array custom)
        {
            _applicationObject = (DTE2)application;
            _addInInstance = (AddIn)addInInst;
            if(connectMode == ext_ConnectMode.ext_cm_UISetup) {
                var contextGUIDS = new object[] { };
                var commands = (Commands2)_applicationObject.Commands;
                var toolsMenuName = "Tools";
                var menuBarCommandBar = ((CommandBars)_applicationObject.CommandBars)["MenuBar"];
                var toolsControl = menuBarCommandBar.Controls[toolsMenuName];
                var toolsPopup = (CommandBarPopup)toolsControl;

                try {
                    var command = commands.AddNamedCommand2(_addInInstance, "AddinByRoslyn", "AddinByRoslyn", "Executes the command for AddinByRoslyn", true, 59, ref contextGUIDS, (int)vsCommandStatus.vsCommandStatusSupported+(int)vsCommandStatus.vsCommandStatusEnabled, (int)vsCommandStyle.vsCommandStylePictAndText, vsCommandControlType.vsCommandControlTypeButton);
                    if (command != null && toolsPopup != null)
                        command.AddControl(toolsPopup.CommandBar, 1);
                } catch(System.ArgumentException) {
                }
            }
        }

        public void OnDisconnection(ext_DisconnectMode disconnectMode, ref Array custom) {}
        public void OnAddInsUpdate (ref Array custom) {}
        public void OnStartupComplete(ref Array custom) {}
        public void OnBeginShutdown (ref Array custom) {}

        public void QueryStatus(string commandName, vsCommandStatusTextWanted neededText, ref vsCommandStatus status, ref object commandText)
        {
            if (neededText == vsCommandStatusTextWanted.vsCommandStatusTextWantedNone &&
                commandName == "AddinByRoslyn.Connect.AddinByRoslyn")
                status = (vsCommandStatus)vsCommandStatus.vsCommandStatusSupported|vsCommandStatus.vsCommandStatusEnabled;
        }

        // カスタマイズする Exec メソッド
        public void Exec(string commandName, vsCommandExecOption executeOption, ref object varIn, ref object varOut, ref bool handled)
        {
            if (executeOption == vsCommandExecOption.vsCommandExecOptionDoDefault &&
                commandName == "AddinByRoslyn.Connect.AddinByRoslyn") {
                var view = new View(GetSourceFileName()); // View のインスタンスにソースファイル名を渡す
                view.Show();
                handled = true;
            } else {
                handled = false;
            }
        }

        // ソース ファイル名の取得 (追加する private メソッド)
        string GetSourceFileName()
        {
            var items = _applicationObject.SelectedItems;
            if (items.Count == 0)
                return null;
            var item = items.Item(1);
            return item.ProjectItem.get_FileNames(1);
        }
    }
}

■ 実行

それでは、試してみよう。

Visual Studio から実行してみると、別の Visual Studio が起動する。

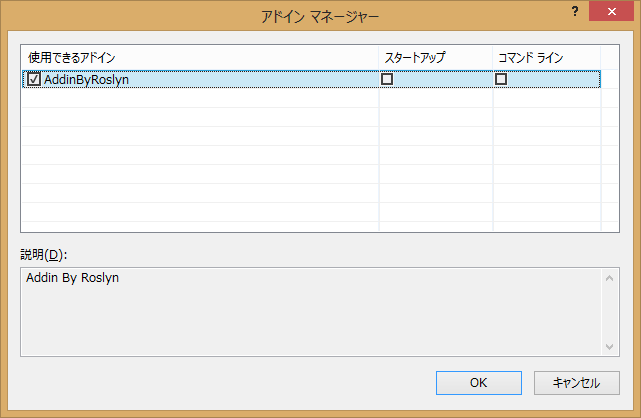
新たに起動した Visual Studio で、メニュー から「ツール」 - 「アドイン マネージャー」を開く。

アドイン マネージャー
アドイン マネージャー

作成したアドインが追加できるようになっているのが分かる。

実際に、新たに起動した Visual Studio で今回作成したプロジェクトを開き、ViewModel.cs を開いた状態で、アドインを実行してみよう。

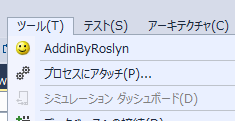
新たに起動した方の Visual Studio で、メニュー から「ツール」 で、新しいアドインを実行する。

アドインの実行
アドインの実行

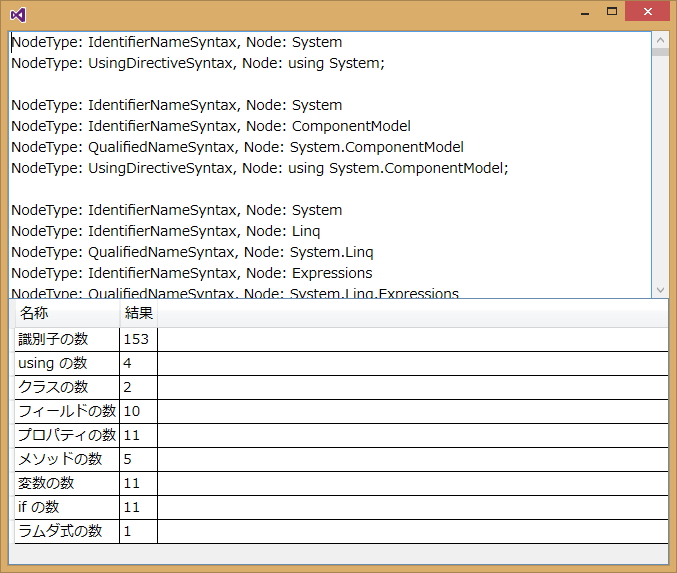
アドインが起動すると、ウィンドウが開き、結果が表示される。

アドインの実行結果
アドインの実行結果

■ まとめ

今回は、Roslyn を使って単に何種類かの文法要素を数えただけだが、同様の方法で、より複雑な解析を行ったり、一部を変更したりすることもできる。

また、先に述べたように、Roslyn の機能は C# や Visual Basic のソースコードの解析だけではない。他の機能についても、いずれ解説して行きたい。

About 2013年07月

2013年07月にブログ「プログラミング C# - 翔ソフトウェア (Sho's)」に投稿されたすべてのエントリーです。過去のものから新しいものへ順番に並んでいます。

前のアーカイブは2013年06月です。

次のアーカイブは2013年09月です。

他にも多くのエントリーがあります。メインページアーカイブページも見てください。

Powered by
Movable Type 3.35